Speed Up Lightroom CC 5-Fold With Ramdisk
6 min read
Want to improve Photoshop Lightroom performance? Try this method! Boost your Lightroom Performance and Improve Speed! How to make Lightroom faster! Get rid of the infamous Loading spinner in LR CC! Pictures loading 5 times faster!!

See this spinner? This happens too often, especially when you swap between pictures, deciding which one to keep. Even on an Intel i7 with 32GB RAM, and this is not acceptable. Below is a list of tips and a complete RAMDISK method to Boost Lightroom CC classic performance in loading, and working swapping between pictures. Exit the loading spinner!
Presentation
Simple: both the Lightroom CC catalog and the software itself must reside in a RAMDISK. This way, both the software and the 1:1 previews will load at light speed! 10GB/s speed!
This method implies that you will perform regular catalog backups, that you can easily automate with a script that I also provide.
Don’t get me wrong, even without a RAMDISK, your Lightroom catalog will likely get corrupted one day. It happened to many people, just ask around you.
Disclaimer
- This is for Windows users only. For Mac users, the method would be the same, provided that you can find a similar RAMDISK tool
- This *may* not help for Lightroom CC Cloud – your edits are done online and I don’t know where the previews are stored. Please let me know in the comments
- Enabling Smart previews did NOT help since they are stored and loaded on disk as well
- DNG Full Smart previews need to be disabled for this method to make sense
-
You could avoid using this method if you can afford a M.2 NVMe PCIe x4 SSD with 10Gb/s read speed
- I tested my internal SSD for read/write speed and it turned out it was barely above 100MB/s. Not all SSD are made equal
- RAMDISK go up to 10,000MB/s. Other factors are at play but you get the idea.
-
Make regular backups of your RAMDISK content with software like syncBack free or a 7-zip batch
- I cannot be held responsible if you mess up your system and lose all your files. Read carefully and you will see that it’s pretty easy
Rationale for RAMDISK
RAMDISK speeds are still way beyond what an NVMe can offer in 2021. Below is a comparison between a RAMDISK, the fastest M.2 NVMe (Samsung PCIe Gen4 NVMe 7000MB/s) that I could find which fits the other motherboard I have (ASUS Prime H310M-rev1.0), and the native M.2 NVMe included in a Dell G3 3779:
[ebstable width =”100%” style =”” responsive =”true”] [ebstable_head] [ebsth_column]CrystalDiskMark dell G3 3779 M.2 PC SN520 NVMe WDC 128GB[/ebsth_column] [ebsth_column]CrystalDiskMark PM9A1 NVMe Samsung 512GB PCIe3x4[/ebsth_column] [ebsth_column]CrystalDiskMark RAMDISK G.SKILL Ripjaws 32GB SO-DIMM DDR4 2666 PC4 21300[/ebsth_column] [/ebstable_head] [ebstable_body] [ebstable_row] [ebsrow_column]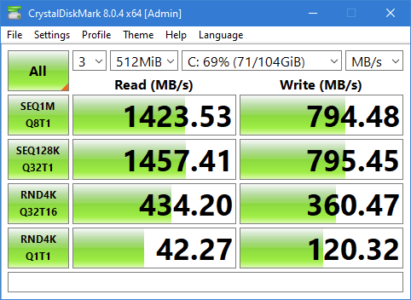
In reality, I get at best 180MB/s write speed and 1.2GB/s read[/ebsrow_column]
Motherboard: Dell G3 3779
[ebsrow_column]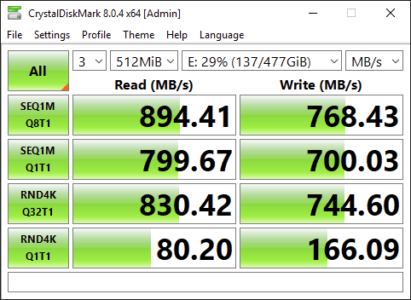
In reality, I get at best 600MB/s write speed and 2GB/s read
Motherboard: Prime H310M-A
[/ebsrow_column] [ebsrow_column]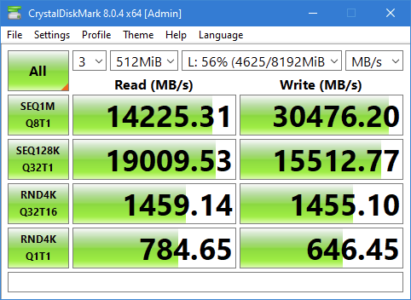
In reality, I get only 2GB/s of read+write speed, for whatever reason
Motherboard: Dell G3 3779[/ebsrow_column] [/ebstable_row] [/ebstable_body] [/ebstable]
You can see by yourself that in 2021, with decent/low-range hardware, using the lowest sequential score from RAM vs highest NVMe scores, the best NVMe are still:
- 19 times behind in write speed
- 10 times behind in read speed
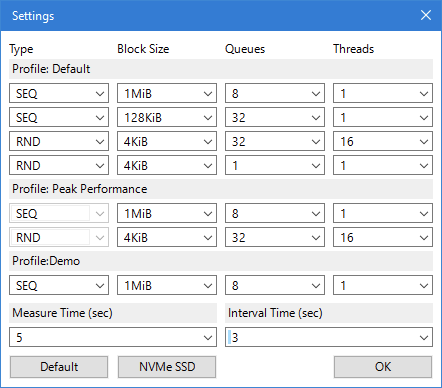
For information, these are the settings used for these tests: SSD NVMe has been selected
How To get Lightroom CC 500% speed increase
-
Buy 32GB RAM sticks for your PC/laptop
-
Preparation: decide where the Ramdisk, backup data and scripts will reside
-
Create a RAMDISK big enough for your catalog + LR install (1.5gb) – mine is 8GB large for both LR + a 3GB catalog
-
Install Primo Ramdisk: unlike Softperfect Ramdisk, it is reliable. Those RAMDISK software can synchronize the content back to your hard drive on a schedule; I setup synchronization every 5 minutes
-
Move your catalog to the RAMDISK
-
Uninstall then Reinstall Lightroom on the RAMDISK
-
Setup Lightroom:
-
Use the RAMDISK for its RAW cache as well
- Disable catalog backups
-
Setup Lightroom importer to create 1:1 previews only during import
-
Scheduled the purge of the 1:1 previews, as you don’t need them after you finished working on a project
-
- Optional: scheduled backups
-
Done
Now, enjoy switching between pictures with left/right arrows without the spinner any more!
Optimize your hardware and OS
The first thing to do is indeed improve your hardware. However, if you cannot afford the latest gaming computer or laptop, this method is for you! The only thing to buy is a pair of RAM sticks for your computer, and it’s usually under $150.
Detailed installation to increase Lightroom performance
Preparation
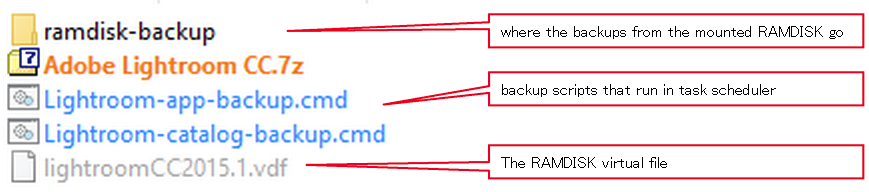
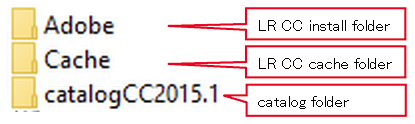
I simply use a folder where everything reside. It’s simple to backup the whole thing on an external drive once a month. Below is the content of the folder:
Primo Ramdisk
With the development of fast speed SSD and NVMe, there are less and less RAMDISK options available because, less demand. Primo Ramdisk is the only one I could find that offers both reliability, support, for a fair price.
How it works:

You can pay if you want, personally I used BitTorrent.
Create a new disk, size it as you need for your catalog, then Browse where the disk file will reside:
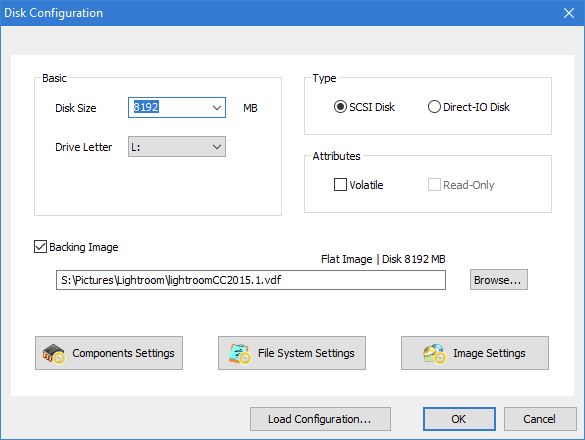
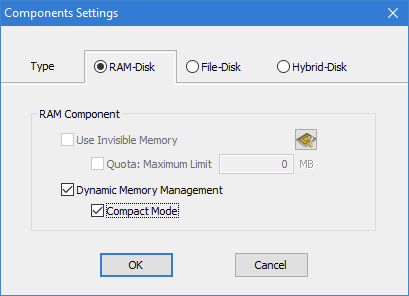
Then select the disk type in Components Settings:
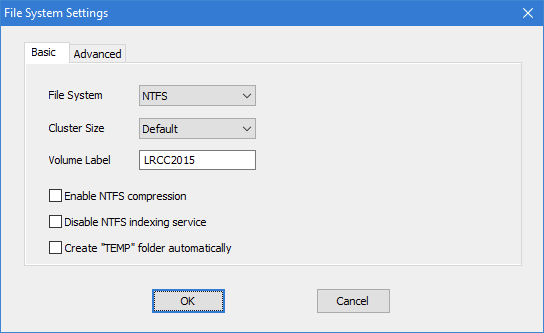
Under File System Settings, select NTFS:
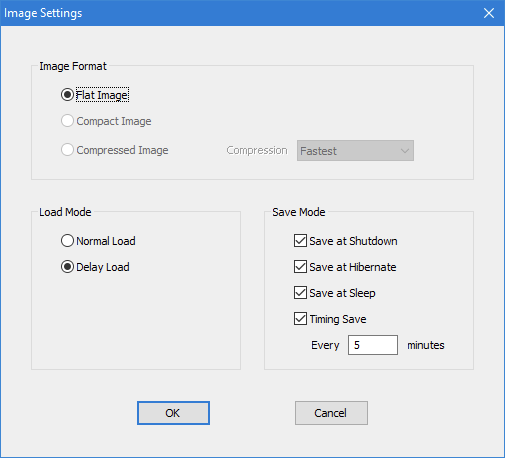
Finally, the most important part: under Image Settings, select Delay Load and input how often you want the data synchronized back to the hard drive:
Setup Lightroom
Edit >Preferences…
Camera Raw Cache on the RAMDISK

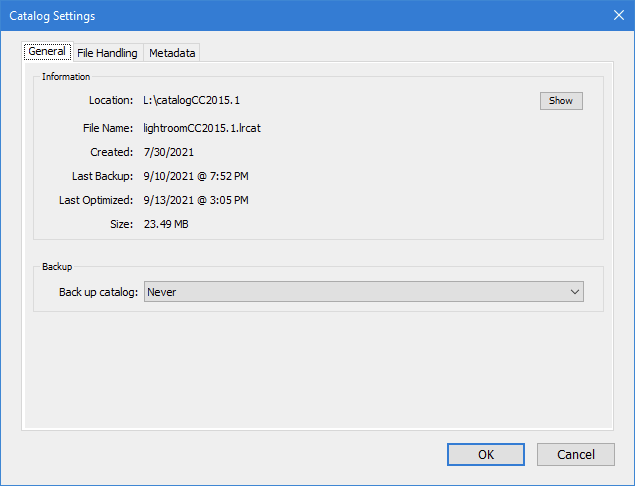
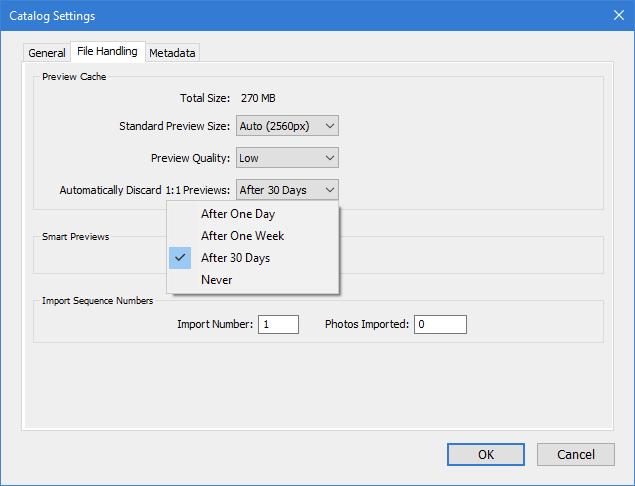
Catalog Settings
Edit > Catalog Settings…
Make sure to discard the 1:1 previews on a schedule, otherwise your RAMDISK will explode
Setup the importer to always create 1:1 previews
That’s the secret sauce. Without 1:1 previews, LR is constantly rebuilding parts of the picture you are zooming in, and loses it when you swap left and right. Then you get the frustrating loading spinner.
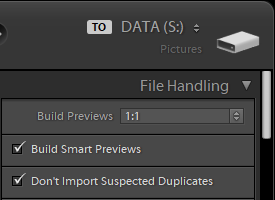
Enabling 1:1 without RAMDISK will already double the speed of Lightroom, just try.
Save it as an import preset!
How the Root of the RAMDISK looks like:
Backups, backups, backups…
A little secret for you: all you need to backup is the database and the settings folder. There are other settings saved under %APPDATA%\Adobe\Lightroom\Preferences\ but since they are not on the RAMDISK, I will just mention them.
Under the catalog main folder: the Lightroom database is a single file, called <your catalog name>.lrcat and the settings (your presets, etc) is a folder called Lightroom Settings.
All the other folders are the different preview sizes and also the Smart previews: you can rebuild them if you have at least the catalog file and your settings folder!
Indeed we are going to backup everything. It’s fine to trust Primo Ramdisk, but the CIA rules tell you: better safe than sorry.
[ebsbutton style=”btn-info btn-lg” icon=”glyphicon glyphicon-download-alt” align=”left” type=”link” target=”true” title=”Lightroom-backup-scripts.7z” link=”/wp-content/uploads/2021/09/Lightroom-backup-scripts.7z” linkrel=””]
Download these scripts and place them in the Lightroom global folder that contains everything.
Requisites: install 7-zip.
You can run them manually or schedule them as tasks. How to create scheduled tasks in Windows.
Conclusion
It’s been months I’m using this method happily. I had BSOD more then once and never got the virtual disk corrupt yet. Even if it got corrupt, I got backups of the content and can recreate it as I want. It’s eating few RAM, thanks to lazy loading. I trust that even 32GB of RAM is overkill.
It was a fun project, but I have moved on to Darktable so LR can rest in peace. Let me know down in the comments if you tried and that it works for you, or if you ran into issues, or if you want to share a better method.