Tag Archives: ssl

How To Install Pi-Hole DNS Ad blocker

Pi-hole a Network-wide DNS Ad-Blocker aka A black hole for Internet advertisements. Primarily developed for Raspberry Pi and ported to Linux, it’s lightweight. Just like pixelserv (man-in-the-middle https DNS Ad-Blocker), it is also a DNS server.

Read more: How To Install Pi-Hole DNS Ad blocker

1. Install a supported operating system

You can run Pi-hole in a container, or deploy it directly to a supported operating system via their automated installer.

Pi-hole Supported Linux distros:

DistributionReleaseArchitecture
RaspbianStretch / BusterARM
Ubuntu16.x / 18.xARM / x86_64
Debian9 / 10ARM / x86_64 / i386
Fedora28 / 29ARM / x86_64
CentOS7x86_64
Warning:
If you happen to have another DNS server running such as BIND, you will need to turn it off in order for Pi-hole to respond to DNS queries.

Ubuntu users: This is compatible with systemd-resolve (on AWS, it’s listening on 127.0.0.53 so it does not interfere with Pi-Hole).

2. Install Pi-hole

Their automated installer asks you a few questions and then sets everything up for you. Once complete, move onto step 3.

One-step install:

curl -sSL https://install.pi-hole.net | bash

The installer is interactive.

  • DNS: choose Cloudflare (fastest) or Quad9 (Secure)
  • Privacy Mode for FTL: Using privacy levels you can specify which level of detail you want to see in your Pi-hole statistics. This question happens only when you choose to install the web admin interface.


Auto-Update and Cron jobs

Cron jobs are created by the installer:

cat /etc/cron.d/pihole
# Pi-hole: A black hole for Internet advertisements
# (c) 2017 Pi-hole, LLC (https://pi-hole.net)
# Network-wide ad blocking via your own hardware.
#
# Updates ad sources every week
#
# This file is copyright under the latest version of the EUPL.
# Please see LICENSE file for your rights under this license.
#
#
#
# This file is under source-control of the Pi-hole installation and update
# scripts, any changes made to this file will be overwritten when the softare
# is updated or re-installed. Please make any changes to the appropriate crontab
# or other cron file snippets.

# Pi-hole: Update the ad sources once a week on Sunday at a random time in the
#          early morning. Download any updates from the adlists
#          Squash output to log, then splat the log to stdout on error to allow for
#          standard crontab job error handling.
51 3   * * 7   root    PATH="$PATH:/usr/local/bin/" pihole updateGravity >/var/log/pihole_updateGravity.log || cat /var/log/pihole_updateGravity.log

# Pi-hole: Flush the log daily at 00:00
#          The flush script will use logrotate if available
#          parameter "once": logrotate only once (default is twice)
#          parameter "quiet": don't print messages
00 00   * * *   root    PATH="$PATH:/usr/local/bin/" pihole flush once quiet

@reboot root /usr/sbin/logrotate /etc/pihole/logrotate

# Pi-hole: Grab local version and branch every 10 minutes
*/10 *  * * *   root    PATH="$PATH:/usr/local/bin/" pihole updatechecker local

# Pi-hole: Grab remote version every 24 hours
9 16  * * *   root    PATH="$PATH:/usr/local/bin/" pihole updatechecker remote
@reboot root    PATH="$PATH:/usr/local/bin/" pihole updatechecker remote reboot


3. Status Check

pi-hole web status check


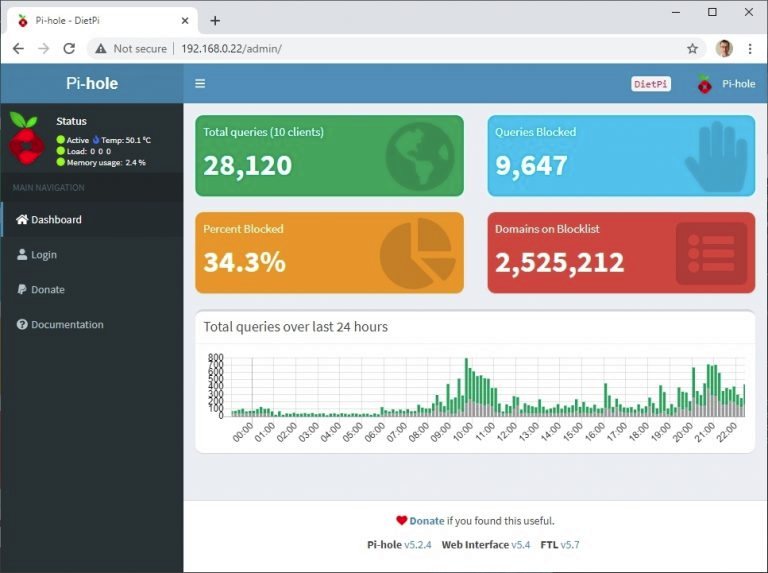
Web UI: Change your password!

pihole -a -p
By default, the web admin UI installed with lighttpd listens only on HTTP:80. You password will travel in clear text if you do not enable SSL!

Web UI Configuration

The web UI showcase logs and point & click configuration. If you chose to install lighttpd, the web UI is available at your pihole IP/admin

To use your existing web server, create a virtual host which points to /var/www/html where Pi-Hole installed its web UI.
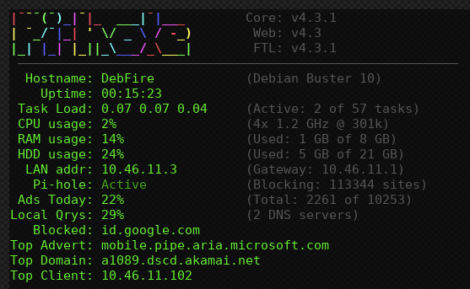
Command Line

You don’t need to install the Web UI to check Pi-hole status. Especially on Raspberry Pi for which this Ad-blocker has been designed, a simple command line dashboard is available to check the server status:

pihole -c
pihole server status


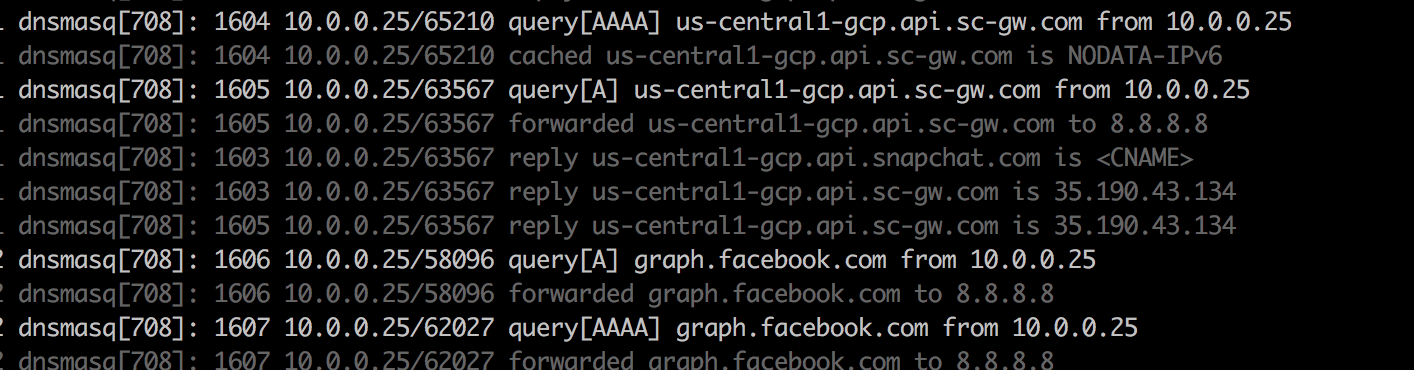
You can also follow the DNS logs directly:

pihole -t
pihole follow DNS logs


4. Use Pi-hole as your DNS server

Depending on what and where you installed Pi-Hole, consider modifying your devices accordingly.

If your Pi-Hole is installed on a public IP server, consider updating your ISP or DD-wrt router to use that DNS as well! You can also share it with your friends! also consider installing it both online and at home, for redundancy.

Example 1 Home router

Pi-Hole
Generic router DNS configuration

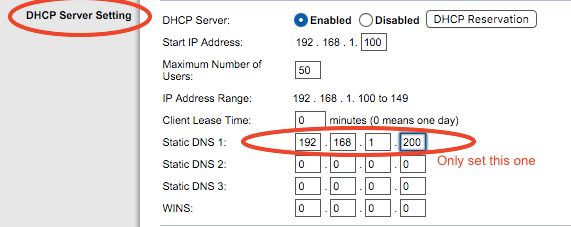
Modify the home or ISP router to use that DNS instead of the default. All your home connected devices will be protected!

Notice:
Some crappy routers will force you to define two different DNS addresses. Use 127.0.0.1 as secondary DNS or install another Pi-hole server online or at home. The secondary DNS is naver used unless the first one is down.


Example 2 Individual Protection

You can also setup each device individually. This guide will show you how to do it on most platforms including Android, Apple Mac and iPhone.

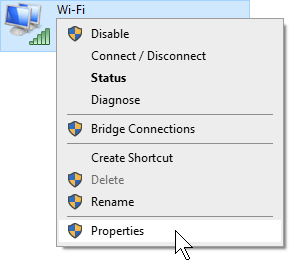
For instance on Windows, open Adapter Options:

Properties of adapter

 
Windows TCP/IP properties

You can also access Adapter Options by running this command:

::{26EE0668-A00A-44D7-9371-BEB064C98683}\3\::{7007ACC7-3202-11D1-AAD2-00805FC1270E}

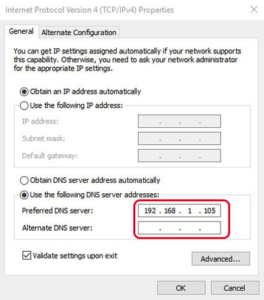
Right-click on your network card and setup the IPv4 DNS manually.

Example 3 Pi-Hole with VPN Server

This is the recommended setup. Not only your ISP cannot track you anymore, but you also utterly destroy any attempt from Ad servers to bug you anymore, transparently and setup-free!

If you are running an OpenVPN server for instance (How To Install OpenVPN Server here), you need to define the new Pi-Hole DNS address in the /etc/openvpn/server.conf file.


To do so, save, then edit the config file, and keep only one line if you have only one Pi-Hole DNS address (replace 1.2.3.4 by your Pi-Hole DNS IP):

vi /etc/openvpn/server.conf
push "dhcp-option DNS 1.2.3.4"

Then restart the OpenVPN service:

service openvpn restart

Pi-Hole used as the main DNS of the OpenVPN server will effectively filter Ads for any client using that VPN. Also setup the home ISP router and your secondary DD-wrt router to use it so even your home devices are protected!


5. Enjoy

I disabled browser Ad-blocker plugins such as uBlock Origin and started surfing over the Ad-bloated Macworld.com and other fake news mainstream medias. I also noticed some Ads on iPhone games were absent but not all of them.


Test Pi-hole Ad-blocking Power

nytimes.com without pi-hole

nytimes.com without pi-hole


Do you see any ads? If you see Ads, maybe that’s because they are hosted (same url as the main website) aka interstitial Ads. Pi-hole can do nothing for self-hosted Ads and you need to pair it with browser Ad-Blockers like uBlock Origin.

The best of all? Most of the mobile Ads on Apple and Android phones are blocked as well! No more stupid Ad countdown interrupting my son’s games!

Not all of them will be blocked because, again, some are still self-hosted on the game developer’s platform.

Cloud Backup Strategy on AWS

Cloud Backup

Always have a Cloud Backup plan.

Mila Kunis

So, you moved to the Cloud and you got yourself one or more server? You host your own data and potentially even client data? What if you got hacked today? Database corruption, File corruption, accidental deletion, all these nice things happen all the time.

Cloud Backup Its Not a Matter “If” but “When”

IRS Criminal Investigation

Hopefully, AWS offers lots of options when it comes to Cloud Backup and data redundancy. On the other hand, Online Cloud Backup is not free. EBS Snapshots and S3 Buckets are darn cheap, but costs accumulate since you pay by the GB.

What Are My Cloud Backup Options?

EBS Snapshots

Cloud Backup

Convenient, easy to generate, easy to automate, EBS Snapshots are however the most expensive Cloud Backup option from AWS.

EBS Snapshots = $0.05 per GB-month of data stored
50GB = $2.5 per month

Snapshots are critical for fast data recovery though, they are therefore necessary for your system volumes. Convenient, easy to generate, easy to automate, EBS Snapshots however can become quite expensive in the long run.

AWS-Snapshot-Policy-Schedule

Conclusion: You can live with only one snapshot in rotation every 24h per system volume, but for data volumes you certainly do not want that. Also, indeed Snapshots can be automated by aws cli, it makes the Snapshots console neither fish nor fowl. You don’t have this issue with S3 Buckets since you are forced to build scripts from the start.


What are these aws cli scripts you are mentioning?

Check this AWS documentation out. 

S3 Buckets

S3 Buckets are a much cheaper Cloud Backup alternative. Pretty much everything to know is said on AWS’ own wiki, but it’s a bit more complex. Depending on how frequently you want to access your data, you can go as low as $0.00099, as of 2020. Look at the prices below

 Storage pricing
   S3 Standard – General purpose storage for any type of data, typically used for frequently accessed data  
 First 50 TB / Month That’s already half the cost of Snapshots$0.023 per GB 
 Next 450 TB / Month $0.022 per GB 
 Over 500 TB / Month $0.021 per GB 
 S3 Intelligent – Tiering * – Automatic cost savings for data with unknown or changing access patterns  
 Frequent Access Tier, First 50 TB / Month $0.023 per GB 
 Frequent Access Tier, Next 450 TB / Month $0.022 per GB 
 Frequent Access Tier, Over 500 TB / Month $0.021 per GB 
 Infrequent Access Tier, All Storage / Month $0.0125 per GB 
 Monitoring and Automation, All Storage / Month $0.0025 per 1,000 objects 
  
 S3 Standard – Infrequent Access * – For long lived but infrequently accessed data that needs millisecond access $0.0125 per GB 
  
 S3 One Zone – Infrequent Access * – For re-createable infrequently accessed data that needs millisecond access $0.01 per GB 
  
   S3 Glacier ** – For long-term backups and archives with retrieval option from 1 minute to 12 hours $0.004 per GB 
  
 S3 Glacier Deep Archive ** – For long-term data archiving that is accessed once or twice in a year and can be restored within 12 hours $0.00099 per GB 

S3 Buckets are clearly cheaper. By default, my 50GB volume backup now costs me only $1.15, that’s 53% LESS than Snapshots. However, you cannot upload a Snapshot to S3. Even though they are hosted on S3, that’s in a separate network administered by AWS. All you can do is upload files. Remember dd? This smells like you need scripts!

How much do S3 Buckets cost?

It’s per GB.
Standard = $0.023 (50GB = $1.15/mo)
Standard _IA = $0.0125 (50GB = 62 cents/mo!)
Glacier = $0.004 (50GB = 20 cents/mo!!)
Glacier Deep = $0.00099 (50GB = 5 cents/mo!!!)

Can you automate them?

Yes. With scripts in bash, using the aws cli commands and a bit of cron.

How far back in time can you go for your $$$?

Since you can automate backup files expiration with scripts, it’s easy to keep the few you need and pay only for those.

What if I want to restore last month backup?

Restore the monthly or the weekly that you have setup. You could also retain 30 snapshots in rotation.

Wait a minute. 30 Snapshots?

Yes, for the price of an S3 Glacier, your 30 snapshots at $12/mo now cost less than a dollar! Access costs are negligible.

How much costs 30 Snapshots?

Standard: 30 * 8GB * $0.023 = $5.52/mo
Glacier: 30 * 8GB * $0.004 = $0.96/mo

Can you backup each week instead?

Why not.

Can you automate the snapshots deletion?

Yes.

What scripting language to use?

Scripts with bash or zsh for loafs like me (rely on the aws cli binaries), and Python for the courageous, or Ruby for the smart. Python and Ruby come with ssl and POST capabilities, which is needed to use the S3 API.

Wrapping up

More on S3 automation and its drawbacks in the next post! The goal being to sleep with your deaf ear up, a bit more efforts and challenge is needed the reach the Graal of the ultimate bargain price possible.

If you prefer convenience and money is not an issue, be my guest and go for hand-managed Snapshots in the console.

Resolve SSL Vulnerabilities Detected by testssl


You checked your site SSL configuration with testssl.sh (see Test Your SSL Configuration with testssl) and it returned some SSL vulnerabilities? Here are some recipes to help you make sense of it all. You will most likely need the Mozilla SSL Configuration Generator to protect your site with an up-to-date, correct SSL configuration.

Continue reading Resolve SSL Vulnerabilities Detected by testssl

How To Test SSL Configurations With testssl.sh


Is your current SSL Configuration secure enough? Is you https site rejecting old clients? Here comes a great tool called testssl.sh. It’s a bash script, developed by drwetter on Github, to test SSL Configurations

Enabling SSL for your site is a great idea overall. However, navigate around the multitude of SSL Configurations available for Apache and nginx is quite daunting. What’s best? What’s most secure? Are you privileging compatibility against security? testssl will help you decide what’s best for your site.

Continue reading How To Test SSL Configurations With testssl.sh

SSL Configuration for Dummies


Dealing with SSL Configuration for Apache or nginx is not easy. There are so many ciphers, and we are constantly reading about breaches and exploits caused by some cipher… If you look around, a lot of bloggers propose this and that snippet of configuration, claiming it’s the best. Thus, after some time searching the web, you will feel like you are completely lost!

Hopefully, Mozilla offer an SSL Configuration Generator, to help you decide between security and availability. It’s AUTO-MAGIC!

Continue reading SSL Configuration for Dummies

Meme Generator for Windows – Do It Yourself!


Meme Generator online are legion, and they do not offer the same options. Most will limit the size or shape of your meme, and most will apply their signature stamp on it. Plus it takes time to upload the image, refresh the page etc.

There is a solution for you though, and pretty easy believe me! It’s based on ImageMagick, with a simple drag&drop batch script for Windows. This solution will let you create classy memes even your mother would be proud of!

Continue reading Meme Generator for Windows – Do It Yourself!