In our series dedicated to help you diagnose your own productivity challenges, and work smarter: Time Awareness. This course will give you the skills to help you manage your time, focus and energy.
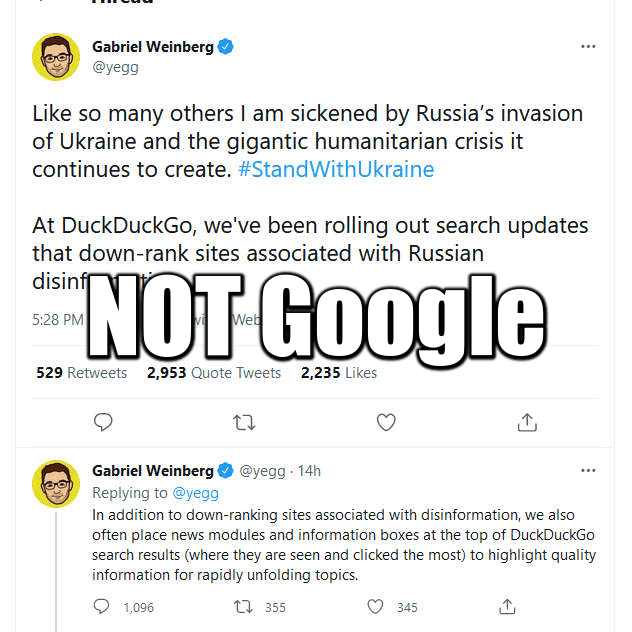
DuckDuckGo has become socialist dictators. Their recent actions against Russia revealed who they are and what they think secretly. Or should I say, who they are not. They claimed to offer Google’s results with added benefit of privacy. However, they just said censorship is now good for you. Meh.
Learn to diagnose your own productivity challenges and walk away with tools for improving your time awareness, prioritization, organization, and focus. The advice below will increase your productivity and enhance your work experience, GUARANTEED or your money back! This post is part of a series that will offer you multiple techniques to improve your productivity by controlling distractions.
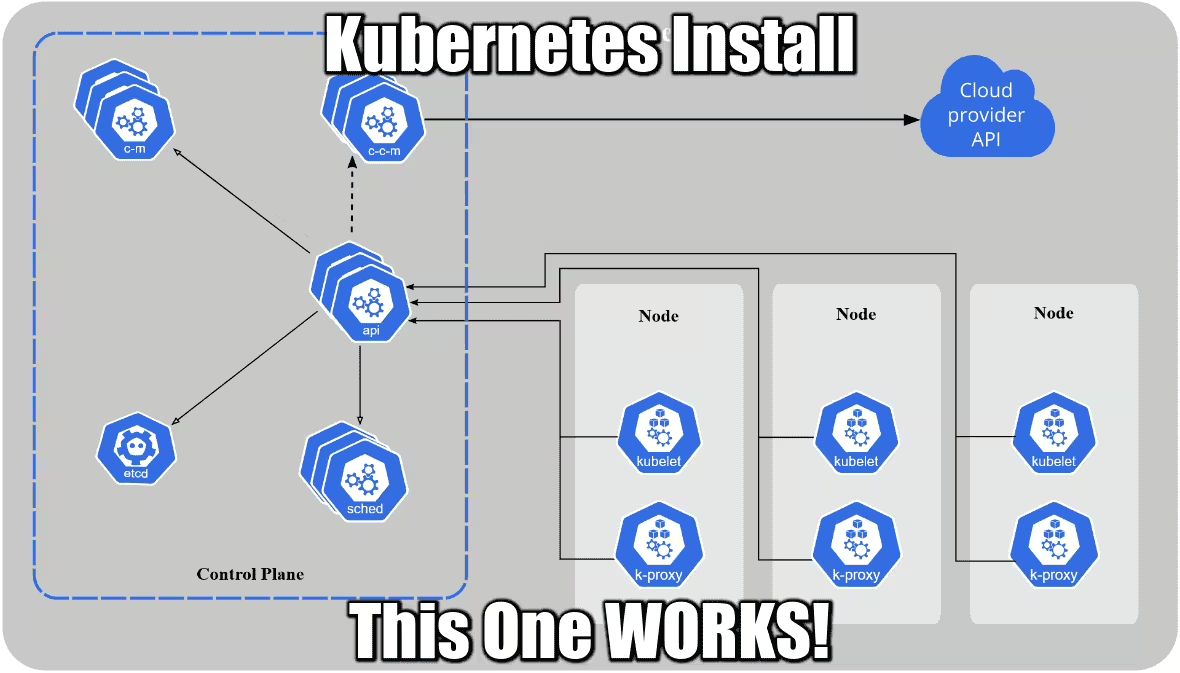
As much as you try, as much as you read their wiki, you will get nowhere until you spend a few hours and open a dozen links. It’s broken from the get go, yes. Installing it without certain parameters just won’t work. This recipe will save you hours. This recipe is just for the first master control-place.
Want to improve Photoshop Lightroom performance? Try this method! Boost your Lightroom Performance and Improve Speed! How to make Lightroom faster! Get rid of the infamous Loading spinner in LR CC! Pictures loading 5 times faster!!
Je quitte Fecalbook pour la seconde et dernière fois. Cette plateforme est devenue comme Tweeter: un cesspool d’avis divergents ou personne ne s’écoute. Même leurs dirigeants en interdisent l’accès a leurs enfants!
Pi-hole a Network-wide DNS Ad-Blocker aka A black hole for Internet advertisements. Primarily developed for Raspberry Pi and ported to Linux, it’s lightweight. Just like pixelserv (man-in-the-middle https DNS Ad-Blocker), it is also a DNS server.
You can run Pi-hole in a container, or deploy it directly to a supported operating system via their automated installer.
Pi-hole Supported Linux distros:
Distribution
Release
Architecture
Raspbian
Stretch / Buster
ARM
Ubuntu
16.x / 18.x
ARM / x86_64
Debian
9 / 10
ARM / x86_64 / i386
Fedora
28 / 29
ARM / x86_64
CentOS
7
x86_64
Warning: If you happen to have another DNS server running such as BIND, you will need to turn it off in order for Pi-hole to respond to DNS queries.
Ubuntu users: This is compatible with systemd-resolve (on AWS, it’s listening on 127.0.0.53 so it does not interfere with Pi-Hole).
2. Install Pi-hole
Their automated installer asks you a few questions and then sets everything up for you. Once complete, move onto step 3.
One-step install:
curl -sSL https://install.pi-hole.net | bash
The installer is interactive.
DNS: choose Cloudflare (fastest) or Quad9 (Secure)
Privacy Mode for FTL: Using privacy levels you can specify which level of detail you want to see in your Pi-hole statistics. This question happens only when you choose to install the web admin interface.
Auto-Update and Cron jobs
Cron jobs are created by the installer:
cat /etc/cron.d/pihole
# Pi-hole: A black hole for Internet advertisements
# (c) 2017 Pi-hole, LLC (https://pi-hole.net)
# Network-wide ad blocking via your own hardware.
#
# Updates ad sources every week
#
# This file is copyright under the latest version of the EUPL.
# Please see LICENSE file for your rights under this license.
#
#
#
# This file is under source-control of the Pi-hole installation and update
# scripts, any changes made to this file will be overwritten when the softare
# is updated or re-installed. Please make any changes to the appropriate crontab
# or other cron file snippets.

# Pi-hole: Update the ad sources once a week on Sunday at a random time in the
#          early morning. Download any updates from the adlists
#          Squash output to log, then splat the log to stdout on error to allow for
#          standard crontab job error handling.
51 3   * * 7   root    PATH="$PATH:/usr/local/bin/" pihole updateGravity >/var/log/pihole_updateGravity.log || cat /var/log/pihole_updateGravity.log

# Pi-hole: Flush the log daily at 00:00
#          The flush script will use logrotate if available
#          parameter "once": logrotate only once (default is twice)
#          parameter "quiet": don't print messages
00 00   * * *   root    PATH="$PATH:/usr/local/bin/" pihole flush once quiet

@reboot root /usr/sbin/logrotate /etc/pihole/logrotate

# Pi-hole: Grab local version and branch every 10 minutes
*/10 *  * * *   root    PATH="$PATH:/usr/local/bin/" pihole updatechecker local

# Pi-hole: Grab remote version every 24 hours
9 16  * * *   root    PATH="$PATH:/usr/local/bin/" pihole updatechecker remote
@reboot root    PATH="$PATH:/usr/local/bin/" pihole updatechecker remote reboot
3. Status Check
Web UI: Change your password!
pihole -a -p
By default, the web admin UI installed with lighttpd listens only on HTTP:80. You password will travel in clear text if you do not enable SSL!
Web UI Configuration
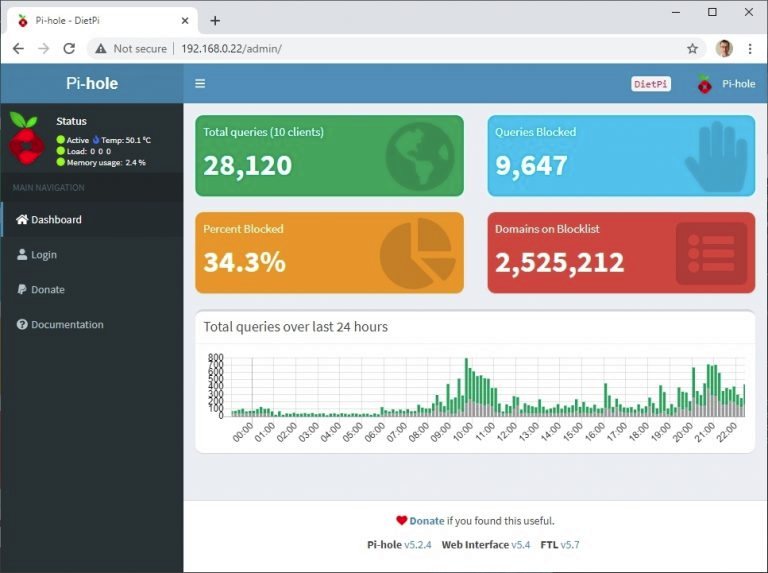
The web UI showcase logs and point & click configuration. If you chose to install lighttpd, the web UI is available at your pihole IP/admin
To use your existing web server, create a virtual host which points to /var/www/html where Pi-Hole installed its web UI.
Command Line
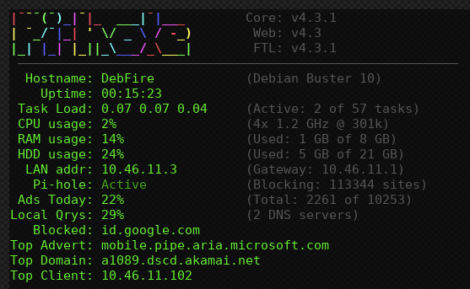
You don’t need to install the Web UI to check Pi-hole status. Especially on Raspberry Pi for which this Ad-blocker has been designed, a simple command line dashboard is available to check the server status:
pihole -c
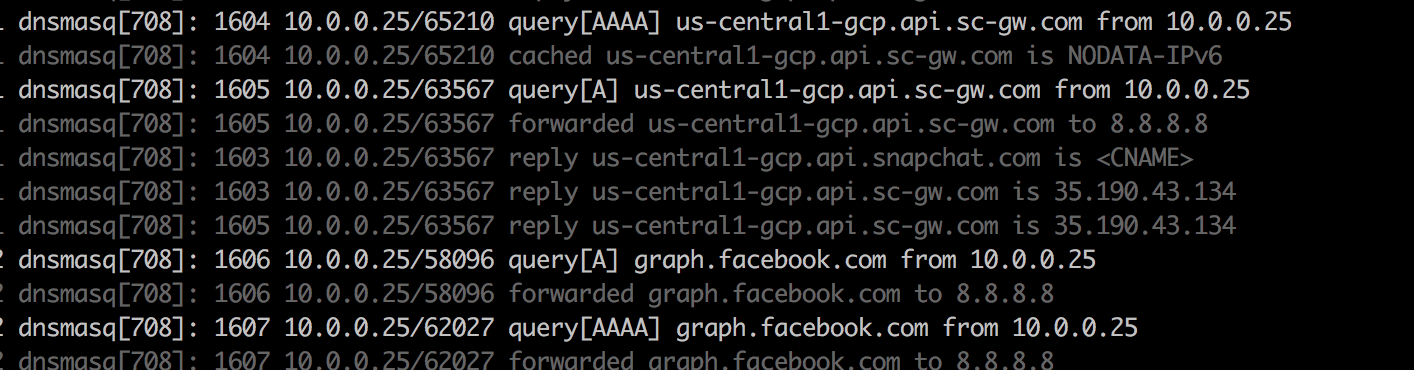
You can also follow the DNS logs directly:
pihole -t
4. Use Pi-hole as your DNS server
Depending on what and where you installed Pi-Hole, consider modifying your devices accordingly.
If your Pi-Hole is installed on a public IP server, consider updating your ISP or DD-wrt router to use that DNS as well! You can also share it with your friends! also consider installing it both online and at home, for redundancy.
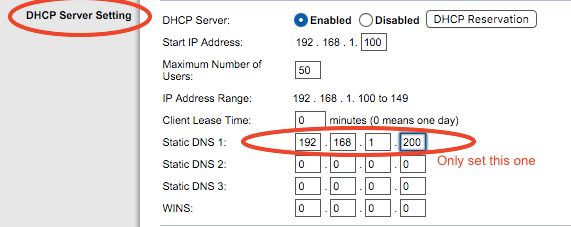
Example 1 Home router
Generic router DNS configuration
Modify the home or ISP router to use that DNS instead of the default. All your home connected devices will be protected!
Notice: Some crappy routers will force you to define two different DNS addresses. Use 127.0.0.1 as secondary DNS or install another Pi-hole server online or at home. The secondary DNS is naver used unless the first one is down.
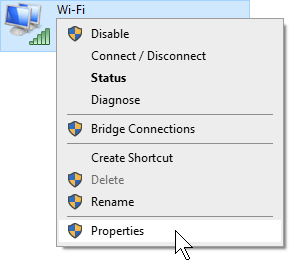
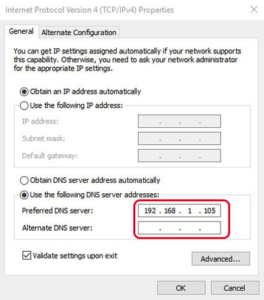
Right-click on your network card and setup the IPv4 DNS manually.
Example 3 Pi-Hole with VPN Server
This is the recommended setup. Not only your ISP cannot track you anymore, but you also utterly destroy any attempt from Ad servers to bug you anymore, transparently and setup-free!
If you are running an OpenVPN server for instance (How To Install OpenVPN Server here), you need to define the new Pi-Hole DNS address in the /etc/openvpn/server.conf file.
To do so, save, then edit the config file, and keep only one line if you have only one Pi-Hole DNS address (replace 1.2.3.4 by your Pi-Hole DNS IP):
vi /etc/openvpn/server.conf
push "dhcp-option DNS 1.2.3.4"
Then restart the OpenVPN service:
service openvpn restart
Pi-Hole used as the main DNS of the OpenVPN server will effectively filter Ads for any client using that VPN. Also setup the home ISP router and your secondary DD-wrt router to use it so even your home devices are protected!
5. Enjoy
I disabled browser Ad-blocker plugins such as uBlock Origin and started surfing over the Ad-bloated Macworld.com and other fake news mainstream medias. I also noticed some Ads on iPhone games were absent but not all of them.
Test Pi-hole Ad-blocking Power
nytimes.com without pi-hole
Do you see any ads? If you see Ads, maybe that’s because they are hosted (same url as the main website) aka interstitial Ads. Pi-hole can do nothing for self-hosted Ads and you need to pair it with browser Ad-Blockers like uBlock Origin.
The best of all? Most of the mobile Ads on Apple and Android phones are blocked as well! No more stupid Ad countdown interrupting my son’s games!
Not all of them will be blocked because, again, some are still self-hosted on the game developer’s platform.
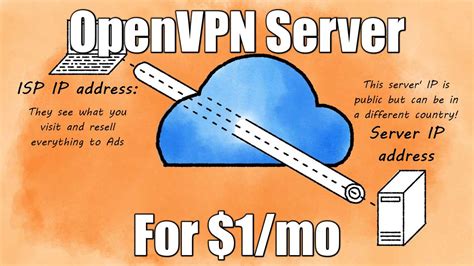
People are (rightfully) freaking out about their privacy as the Senate voted the law S.J. 34 to let internet providers share your private data with advertisers. While it’s important to protect your privacy, it doesn’t mean that you need it at all times. Also, VPN is a service that is not free, but I found you the CHEAPEST DEAL AVAILABLE TODAY: therefore, let’s create a VPN in 15mn for $1/mo!
This guide will show you step by step how to do it with Virmach but this is valid for any other brand, provided you accept the price. The whole point is to use a script that does it for you, so you don’t have to spend a whole day doing it. Yes, setting up a VPN Server by hand is very complicated.
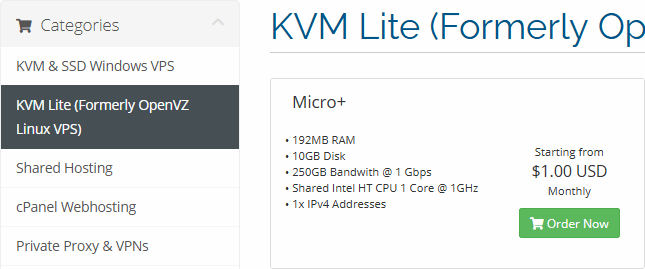
1. Get a KVM Server for $1/mo at Virmach
This is the crapiest, cheapest KVM provider I could find as of March 2020. Unfortunately they do not offer $1/mo plans anymore, because it depends on availability. I highly doubt they ever offered these plans in large quantities but you know how business work, yeah?
Select the cheapest KVM from the Virmach plans available here.
You may have a warning saying they are out of stock but they promise to charge you only $1/mo.
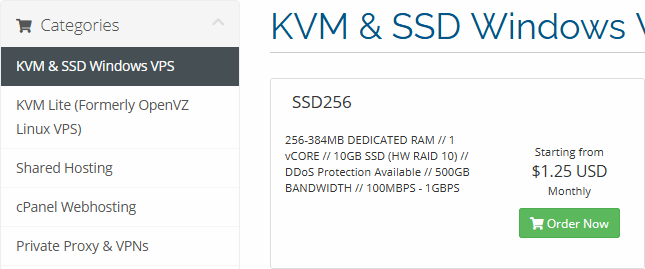
Option 2 would be a slightly better bandwidth at $1.25:
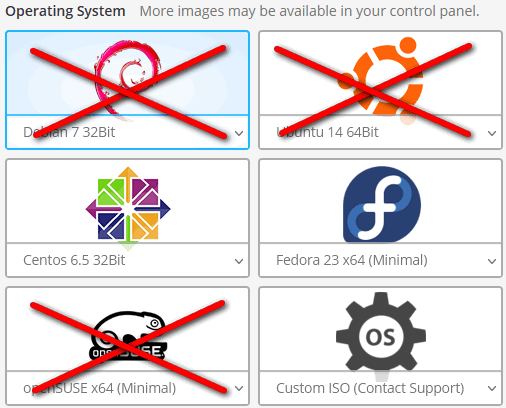
2. Create a RedHat, Debian, Ubuntu or CentOS server
Versions required for the script to work: Supported distros are Ubuntu, Debian, AlmaLinux, Rocky Linux, CentOS and Fedora
Ubuntu 18.04 or higher
Debian 9 or higher
CentOS 7 or higher
Fedora any version
The script that will create the OpenVPN server for you needs to be run on the major versions above. Among the limited options that Virmach offers you for that price, as of September 2021, choose one of these:
The versions shown above are the lowest versions compatible with the script. The rest of the setup in straightforward. Take note of the root password they give you and that’s it.
3. Initial Setup (optional)
Virmach will provide you a root access with a password. All the steps below are optional, especially if you already own an IaaS Cloud server access.
Let me know in the comments how long it actually took you. It took me much more than 15mn because I was writing the guide at the same time, but I think that 15mn altogether is a fair guess.
As of today, March 2020, Virmach let you pay $1 for a $1.25/mo plan because they “ran out” of cheap plans, but you are limited to 1 only. Also, no other location than within the USA are available, which defeats the purpose of a VPN when you live in the USA. What you really want is an access point in Europe.
CenturyLink blocks Kodi. Centurylink blocks Kodi repositories. CenturyLink filters internet without telling you. CenturyLink caps your bandwidth after 6 months. CenturyLink blocks random websites. CenturyLink is BAD.
After moving, I thought that using any competitor to Comcast would be a good idea. After all, it’s one of these ISP that still provide ADSL. It cannot be that bad?
Well, ADSL is not fast, you know that. Do you? ADSL is a branch of DSL that’s provided through existing phone lines. It is therefore sensitive to electromagnetic noise. And the ping is attrocious: 21ms+
Noise can be emited by crappy electric devices such as dishwashers, washing machines, microwave ovens and whatever chinessium crap is connected close to your home.
It is also sensitive to radio signals on the 1400Mhz band. Chinesium crap devices can also emit on this band and hinder your bandwidth.
I also noticed a drop in bandwidth after 6 months.
CenturyLink Caps your Bandwidth
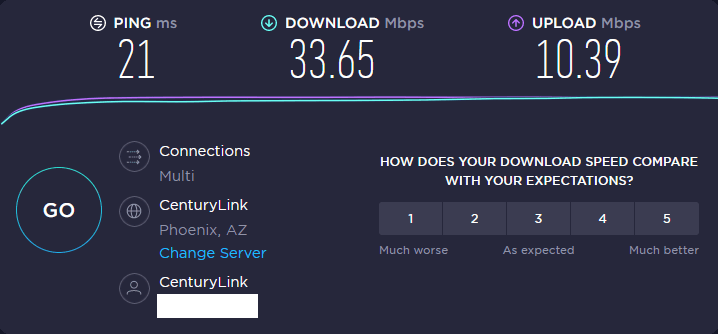
At the beginning, speedtest.net reported a whooping 80MB download speed. Living less than 1 mile away from the DSLAM, it made a lot of sense. 10MB upload speed was honorable for this kind of connection.
Here we are, 6 months later. Speedtest now reports between 20 and 30MB download speed at Any time.
And This is what you get by living 1 mile away from the DSLAM. Imagine if you live further away…
It’s down from 80MB to 30MB after 6 months, permanently and for no reason. Also, Kodi servers are blocked from time to time.
CenturyLink Blocks Kodi Repos
This post is coincidental with me trying to reinstall a new Kodi build on my Rbox pro set-top box. The previous build refused to update most repos and I was not surprised, since it happened in the past with other builds.
It’s a catch-me-if-you-can game between pirated stream providers and the media Majors, we all know that. Still, I could not even configure new 2020 builds I knew that were working.
I could not even access xanax or slamious home site from my desktop. Only from my phone via Verizon. Isn’t that odd??
Edit: as of April 2020, they re-opened the access to most build repos. Maybe it was an internal network issue on their side?
Conclusion: Comcast Is a Monopoly, but CenturyLink Is Worst
CenturyLink can block Kodi repos without warning you. CenturyLink also cap your bandwidth after some time with no reason. Maybe they think you won’t notice?
CenturyLink is hindering your freedom of surfing and therefore your freedom of speech. CenturyLink is not a good alternative to these monopolies that are Comcast, Verizon and AT&T. It’s not even cheaper.
CenturyLink plan, including their crappy modem is worth $60/mo and it’s not worth it. CenturyLink is bad, period.