![]()
![]()

![]()
This is a step by step tutorial on how to scrap web data into an SQLite database, using the scrapy module for Python 2.7. This tutorial is for Windows but you can easily adapt it for Linux.
Another project I have is to port it to work on a Linux Thecus NAS or even better, on a ddwrt router. More updates coming soon.
Introduction
In another page I explained the rationale for doing this. You have your own, but for the sake of the tutorial, I need to show you a real life example, step by step.
The site we will work on here is the TU mobile website from Towson University, Maryland. This is an average level 4 years Public College, averaging 22,000 students, with 62% females.

The TU mobile site collects in real time the enrollment and class availability, and its peak usage is during enrollment periods: at the end of each semesters.
What I propose you to do is this:
- install and configure Python 2.7 portable
- install and configure Scrapy
- analyze the TU mobile website for data to scrap
- play with scrapy console to check how the data is scraped
- initialize the database
- connect Python to the database
- test and build some insert queries to the SQLite database
- analyze the full script with comments
- wrapping up with a batch script to automate the scraping experience
Tools needed
You need at least these tools:
Installation of Python 2.7 + Scrapy for Windows
Install Python 2.7
It’s pretty straightforward, as it’s portable. Just install the package somewhere and make sure to uncheck “integrate into system path“. You may want to install another version of Python someday, and this would cause some issues.
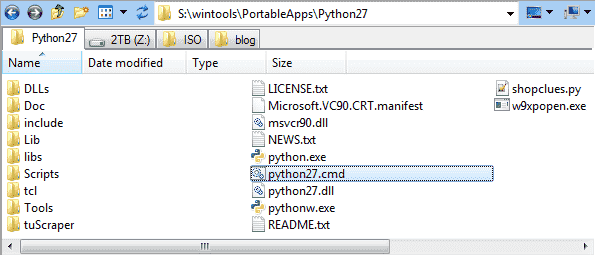
Create a batch for initializing the environment
You’re gonna work with the command line, and we need the PATH variable to be set with Python environment. Since you unchecked the box that would integrate it during install, we need a batch to set that up and open a Windows command line for you.
Open the Python folder and create a Python27.cmd MS-DOS batch with this code:
set PATH=%~dp0;%~dp0Scripts;%PATH%
start cmd.exe
Launch it… and voila:
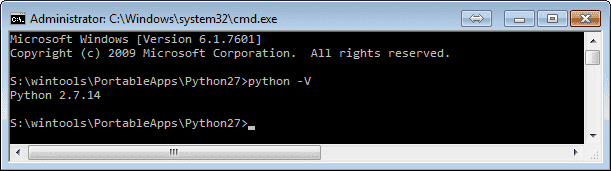
Python 2.7 and its scripts (pip and any module you will install) are now in the environment of this command line.
Scripts
This sub-folder contains PiP, the Python modules installer, and the compiled modules you will install. It needs to be in you PATH environment.
Install Scrapy module
We can now install the scrapy module and its dependencies with pip:
pip install pypiwin32 scrapy arrow
[/panel-heading] [panel-body] If you moved the Python27 folder some place, you may experience this error when launching pip:
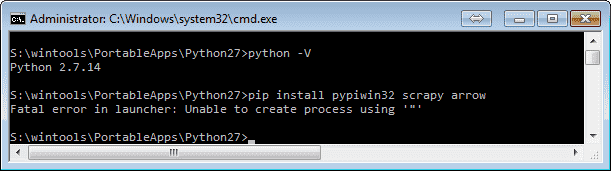
I suspect this is because pip is compiled during installation and need to be recompiled but I didn’t mind to find out how. Anyway, just adapt the command a little bit and you should be set:
python Scripts\pip.exe install pypiwin32 scrapy arrow
Keep in mind that anytime you call a Python compiled module that trashes this error message, the fallback command will be the same:
python Scripts\command.exe [parameters]
Initialize a Scrapy project
Now is time to create your scrapper project. Let’s call it tuScraper:
scrapy startproject tuScraper
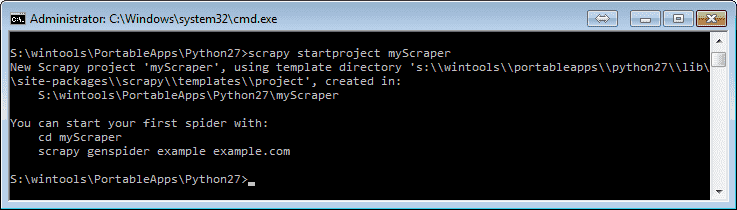
This will create a sub-folder tuScraper with the following structure:
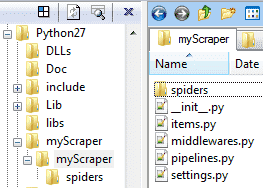
- \Python27
- \Scripts compiled binaries and pip.exe are here
- \tuScraper place your database.sqlite3 here
- \tuScraper these are your config files, pipelines, etc
- \spiders this is where your spiders will be created
- \tuScraper these are your config files, pipelines, etc
Create a Scrapy Spider
Spiders are the actual Python code that will scrap the data from the web. Each project can have multiple spiders for multiple uses, depending on the type of pages and how the data is formatted.
To create a spider:
C:\Python27> cd tuScraper
C:\Python27\tuScraper> scrapy genspider --template=basic tuscraper mytumobile.towson.edu
Now we have very basic tuscraper.py spider under Python27\tuScraper\tuScraper\spiders :
# -*- coding: utf-8 -*-
import scrapy

class TuscraperSpider(scrapy.Spider):
  name = 'tuscraper'
  allowed_domains = ['mytumobile.towson.edu']
  start_urls = ['http://mytumobile.towson.edu/']

  def parse(self, response):
    pass
It doesn’t do a thing, it’s an empty shell. We will modify this spider to process the URLs we need to scrap into the database. Before playing with Scrapy super powers, we need to analyze the website to know how the data is organized.
In Depth Analysis of the Website
Before creating a database, we need to define which data we can import and how many tables are needed. Thus analyzing the website to scrap has to be done now.
It’s important to choose a dynamic website, so the retrieved data will be dependent on the URL. The example chosen in this tutorial is the classes enrollment offered by Towson University College.
Dynamic URLs
If the site you want to scrap doesn’t use dynamic URLs, because of JavaScript for instance, you cannot use Scrapy.
Let’s browse the classes from Spring 2018:
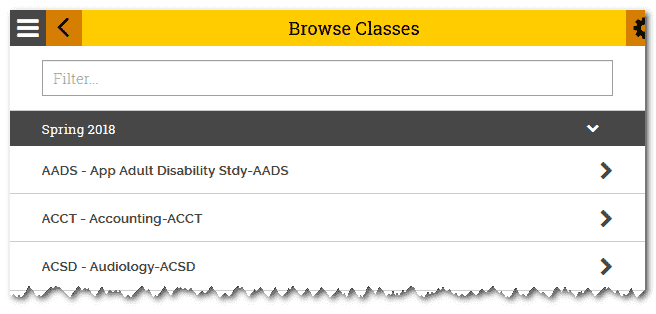
By browsing the classes, we can see that they arranged by class name: XXXX - main title
Let’s open the ACCT Accounting classes:
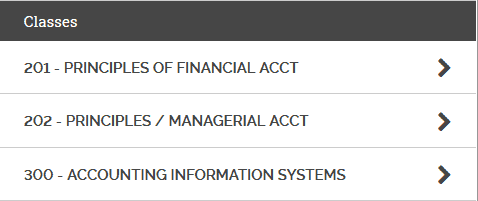
Each sub-class has a leading number and a title. Let’s open the first one:
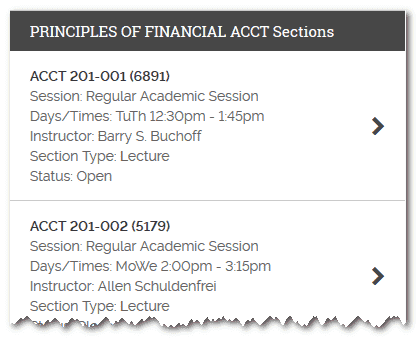
Each class has sections, with different class rooms, meetings and teachers. And if we open a section, there we can see all the attributes of this class:
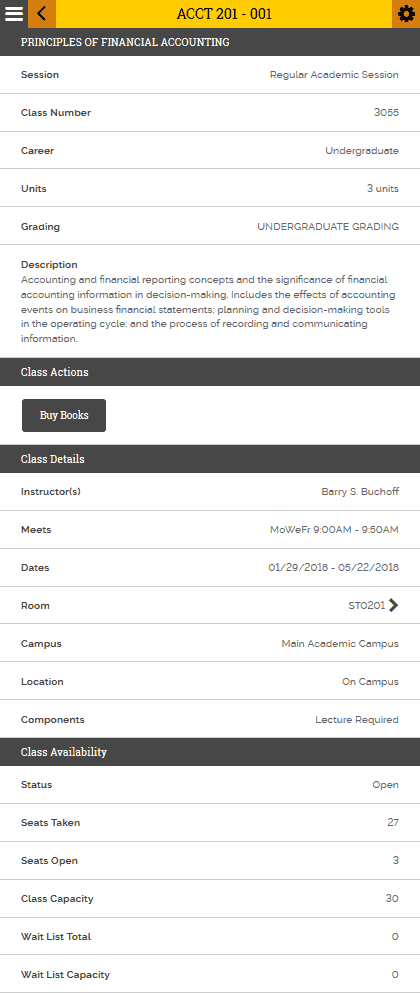
This looks good and easy to scrap!We have attributes on the left, and values on the right, line by line. This is an easy go for us. Each attribute will be a column in our database.
Take note the URL of this page as you will use it in the console.
Scrapy console
Fetch a Page and Send It To the Browser
First thing to do now is open the source code of an example page we need to work on. However, we won’t just do it from the browser directly. Scrapy cannot handle CSS includes and JavaScript correctly.
Thus, we need to work on the source code that Scrapy will actually see. To do so, launch this command from the command line environment:
C:\Python27> scrapy view https://mytumobile.towson.edu/app/catalog/classsection/TOWSN/1182/6764
This will open the page scraped by Scrapy in your browser. From there you can hit F12 to open the debug console and work on the source.
Fetch the Page to Scrapy Shell
From the command line, open a Scrapy shell:
C:\Python27> scrapy shell
Now, from the python command line, fetch the page again:
fetch("https://mytumobile.towson.edu/app/catalog/classsection/TOWSN/1182/6764")

response.css('title::text').extract_first()
# u'ITEC 470 - 101'
You may see the whole HTML code fetched in the object response.text.
Let’s explore the HTML code to find ways to access the data.
Explore the Structure
Let’s explore the title of the class:
![]()
This value, ITEC 470 - 101 can be found in 2 different places: in the head <title> attribute (it’s the title of the tab in your browser), and also later in the code under an h1 tag:
<head>
<meta charset="utf-8">
<meta http-equiv="X-UA-Compatible" content="IE=edge,chrome=1">
  <title>ITEC 470 - 101</title>
  ...
  <h1 class="page-title with-back-btn">ITEC 470 - 101</h1>
  ...
From there, there is 2 different ways to access the text values from the response object: via the css or xpath methods. Both these methods have methods too: extract() and extract_first().
- css: works with CSS attributes: HTML tags and classes
response.css('title::text').extract_first()
# u'ITEC 470 - 101'
response.css('h1.page-title::text').extract_first()
# u'ITEC 470 - 101'
response.css('.page-title::text').extract_first()
# u'ITEC 470 - 101'
response.css('.page-title::text').extract()
# [u'ITEC 470 - 101']
As you can see, there is more than one way to get this particular value as a string with
extract_first(). Note thatextract()will return a list.
- xpath:
response.selector.xpath('//title/text()').extract_first()
# u'ITEC 470 - 101'
response.selector.xpath('//h1/text()').extract()
# [u'ITEC 470 - 101']
The syntax is slightly different but the outputs are the same. Most blogs and StackExchange questions I found concentrate on xpath, though. Maybe it’s more powerful, I don’t really know. And to be honest, I couldn’t manage to properly get the tags’ text with specific classes, and also I do not like its syntax.
Since everything can be done with the css method anyway, this tutorial will be about the css method only.
Let’s explore the topic of the class:
![]()
This text can be found under the following tags:
<section itemscope itemtype="http://schema.org/Class">
  <div class="primary-head" style="" itemprop="name"> SPECIAL TOPICS IN INFORMATION TECHNOLOGY </div>
  ...
Extraction:
response.css('.primary-head::text').extract_first()
# u'\n \n \n \n \n SPECIAL TOPICS IN INFORMATION TECHNOLOGY \n \n '
As you can see, we ran into our first issue. The text extraction outputs also blanks and carriage returns. We will need to create a cleanup function later on.
Let’s explore the first attributes of a class, Session and Class Number:


Well, it turns out that all the class attributes on the page are coded in the same way:
<div class="section-content clearfix" style="">
  <div class="pull-left">
    <div class="strong">Session</div>
  </div>
  <div class="pull-right">
    <div>Regular Academic Session</div>
  </div>
</div>

<div class="section-content clearfix" style="">
  <div class="pull-left">
    <div class="strong">Class Number</div>
  </div>
  <div class="pull-right">
    <div>6764</div>
  </div>
</div>
All the attributes are found under a div.section-content > div.pull-left > div so we code it exactly in the same order: div.section-content div.pull-left div::text
response.css('div.section-content div.pull-left div::text').extract()
# [u'Session', u'Class Number', u'Career', u'Units', u'Grading', u'Topic', u'Description', u'Add Consent', u'Enrollment Requirements', u'Instructor(s)', u'Topic', u'Meets', u'Dates', u'Room', u'Campus', u'Location', u'Components', u'Status', u'Seats Taken', u'Seats Open', u'Class Capacity', u'Wait List Total', u'Wait List Capacity']
Same code slightly different for the values, found under a div.section-content > div.pull-right > div :
response.css('div.section-content div.pull-right div::text').extract()
# [u'Regular Academic Session', u'7608', u'Undergraduate', u'3 units', u'UNDERGRADUATE GRADING', u'Network & Security Practicum', u'Studies in selected areas of information technology. May be repeated for a maximum of 6 units provided a different topic is taken. Prerequisites: 12 units of ITEC, CIS, or COSC courses.', u'Department Consent Required', u'ITEC 470 requires 12 units of ITEC, CIS and /or COSC.', u'Jeffrey Hanson', u'COSC & DIAR/CPS Initiative', u'Mo 6:00PM - 8:40PM', u'08/28/2017 - 12/19/2017', u'Y20111', u'Main Academic Campus', u'On Campus', u'Closed', u'15', u'0', u'15', u'0', u'0']
Cleaning Up the Fetched Data
As seen in Examples 3 & 4, we successfully fetched the list of values for both class attributes and values. However, a quick verification will show that sometimes the number of items is not the same in both outputs. Because of that, we cannot directly zip those outputs into a dictionary. Bellow are two examples and how to deal with them. Your mileage may vary.
If the number of items is lower in the values:
>>> keys=response.css('div.section-content div.pull-left div::text').extract()
>>> values=response.css('div.section-content div.pull-right div::text').extract()
>>> len(keys)
23
>>> len(values)
22
Long story short, it turns out that one of the div in the returned values is empty. Because of that, div::text returns null, and so we miss an item in our list. The solution to this is to re-extract the values from an upper level: div.section-content > div.pull-right > div
This will return the HTML code between the div.pull-right. Then we just need to find the empty div and insert something like 0 or “TBA”. So we extract with the same code but without ::text at the end:
prevalues=response.css('div.section-content div.pull-right div').extract()
prevalues
# [u'<div>Regular Academic Session</div>', u'<div>6764</div>', u'<div>Undergraduate</div>',..

# get indices of items containing "<div></div>" in the prevalues list:
indices = [i for i, x in enumerate(prevalues) if x == "<div></div>"]

# for each empty indice, we insert something in the list:
for i in indices: values.insert(i, "TBA")
If you decide on the other hand that you need to remove an item from the keys for example, just define a list of items to remove and post-process the list after extraction. You may also need to rename some items:
# define a list of items to remove:
keys2remove=['Components']

# Components is undefined in the values, Topic has a duplicate, and sometimes ClassCapacity=CombinedSectionCapacity because they divide big classes in 2 sub-sections
# remove multiple items from a list, against another one:
keys = [e for e in keys if e not in keys2remove]

# rename CombinedSectionCapacity to ClassCapacity:
keys=['ClassCapacity' if x=='CombinedSectionCapacity' else x for x in keys]
That’s one of the many issues you may run into for your project. Hopefully, Python is powerful enough to provide one-liner solutions like these.
We do not want spaces or blank characters in key names because we’re gonna use them as column names for the inserts in SQLite database. Also we do not want unicode (the little ‘u’ before our output) so let’s convert the items to ascii as well:
# cleanup keys by removing non alphanum characters AND re-encode everything to ASCII:
keys = [re.sub(r'\W+', '', i).encode("utf-8") for i in keys]
Database initialization
Install the DB browser
- Windows: SQLiteDatabaseBrowserPortable is portable, so install it some place and just launch it.
- Linux: plenty of solutions are availab2le, just dig on gg:
- Sqliteman
- compile SQLite browser yourself
- Valentina Studio Free
- many, many more
Definition of the database
It is clear that the only variable attributes are under Class Availability. Thus, we need at least 2 tables:
- one main table for the class title, number, description, etc
- one history table for the variable attributes: Status, Seats Taken, etc
The analysis of the URLs also gives us precious information:
https://mytumobile.towson.edu/app/catalog/classsection/TOWSN/1174/6891
Each class has a unique number (here 6891) that we can use as the primary key for the main classes table. The first 4 digits number (1174) is for the term of the class: 1-YY-semester. Last digit is for:
- 1: Winter minimester
- 2: Spring
- 3: Summer
- 4: Fall
For the column names, let’s use the attributes as they are shown, without spaces. We can therefore open DB Browser for SQLite Portable and create a sample database, and our first table classes:
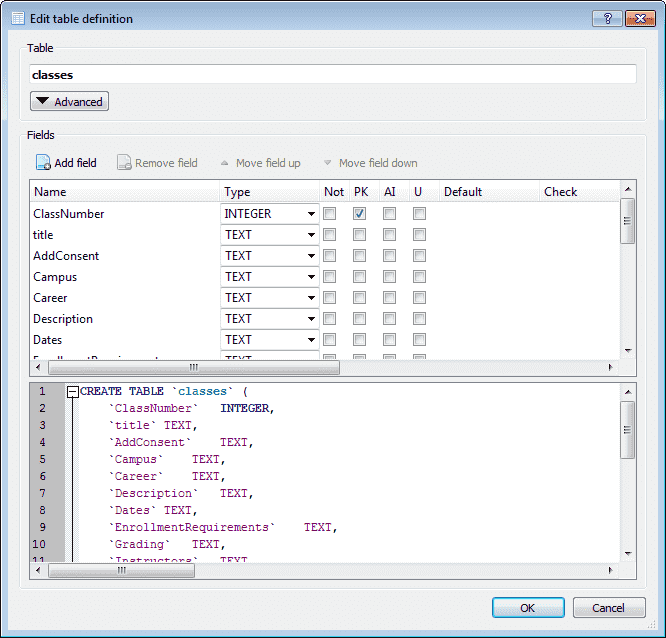
Everything will be text but the PK, as we can always modify it later if needed.
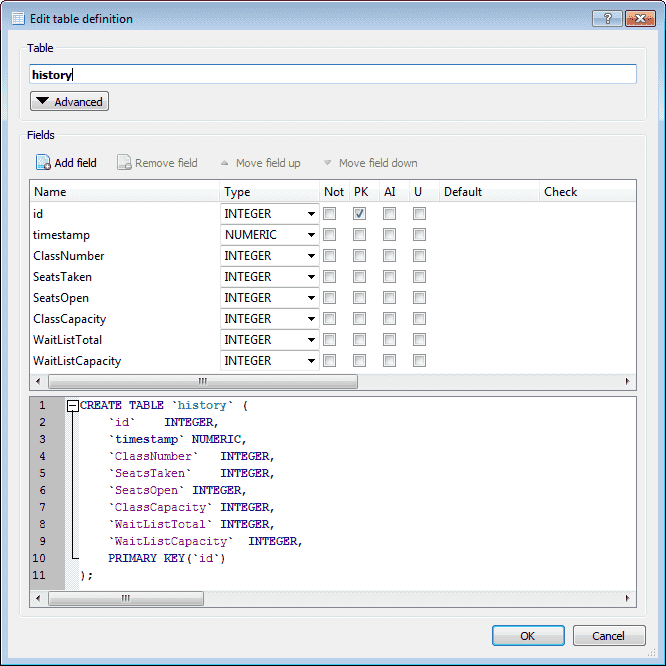
The history table will be defined the same way:
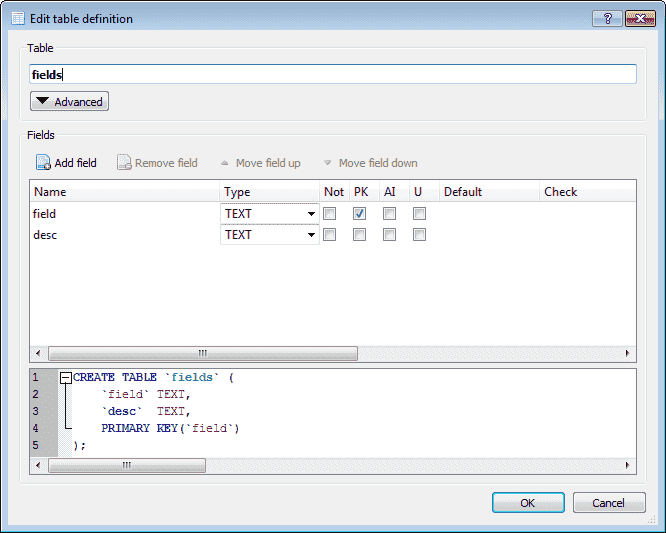
Finally, I decided to add a fields table, to keep the original names of the attributes, with spaces and capitalization:
Create this table with Python
You can create this table and leave it empty as we will recreate it and insert rows from the Python console to validate the connection with the database!
Access SQLite Database from Python
Let’s say the database name and path is <Python path>\tuScraper\tuScraper.0.sqlite3
So, restart a new Python environment DOS command line with the batch you created earlier.
Launch a scrapy shell with a class URL, any class:
scrapy shell https://mytumobile.towson.edu/app/catalog/classsection/TOWSN/1182/6764
You should have this log and the Python prompt:
2018-01-13 01:03:43 [scrapy.extensions.telnet] DEBUG: Telnet console listening on 127.0.0.1:6023
2018-01-13 01:03:43 [scrapy.core.engine] INFO: Spider opened
2018-01-13 01:04:00 [scrapy.core.engine] DEBUG: Crawled (200) <GET https://mytumobile.towson.edu/app/catalog/classsection/TOWSN/1182/6764> (referer: None)
[s] Available Scrapy objects:
[s] scrapy scrapy module (contains scrapy.Request, scrapy.Selector, etc)
[s] crawler <scrapy.crawler.Crawler object at 0x042F7D50>
[s] item {}
[s] request <GET https://mytumobile.towson.edu/app/catalog/classsection/TOWSN/1182/6764>
[s] response <200 https://mytumobile.towson.edu/app/catalog/classsection/TOWSN/1182/6764>
[s] settings <scrapy.settings.Settings object at 0x042F7E50>
[s] spider <DefaultSpider 'default' at 0x4532490>
[s] Useful shortcuts:
[s] fetch(url[, redirect=True]) Fetch URL and update local objects (by default, redirects are followed)
[s] fetch(req) Fetch a scrapy.Request and update local objects
[s] shelp() Shell help (print this help)
[s] view(response) View response in a browser
>>>
All good! First thing to do is loading the sqlite3 and regexp modules:
>>> import sqlite3, re
Next, create a connection to the database and a cursor:
db = sqlite3.connect('tuScraper/tuScraper.0.sqlite3')
cursor = db.cursor()
Now, DROP and CREATE the fields table:
>>> cursor.execute("DROP TABLE IF EXISTS fields")
<sqlite3.Cursor object at 0x04489FA0>
>>> cursor.execute("CREATE TABLE IF NOT EXISTS fields(field TEXT PRIMARY KEY, desc TEXT)")
<sqlite3.Cursor object at 0x04489FA0>
The output you see is the sign that it worked!
Import the Fields into the Fields Table
As seen in the Scrapy console part, we will scrap the attributes and their values with the css method, into the variables keys and values. Then We remove the “Components” attribute from the keys, then we merge keys and values into a dictionary with the zip method. This will eliminate the duplicate attribute “Topic” as there can be only unique keys in a dictionary:
keys=response.css('div.section-content div.pull-left div::text').extract()
keys.remove('Components')
values=response.css('div.section-content div.pull-right div::text').extract()
classDict = dict(zip(keys,values))
Finally we will parse the dictionary keys into a loop with an SQL INSERT statement to fill the fields table:
for key in classDict:
  cursor.execute("INSERT INTO fields(field, desc) VALUES(?,?)", (re.sub(r'\W+', '', key), key))
<sqlite3.Cursor object at 0x04489FA0>
<sqlite3.Cursor object at 0x04489FA0>
<sqlite3.Cursor object at 0x04489FA0>
<sqlite3.Cursor object at 0x04489FA0>
<sqlite3.Cursor object at 0x04489FA0>
<sqlite3.Cursor object at 0x04489FA0>
<sqlite3.Cursor object at 0x04489FA0>
<sqlite3.Cursor object at 0x04489FA0>
<sqlite3.Cursor object at 0x04489FA0>
<sqlite3.Cursor object at 0x04489FA0>
<sqlite3.Cursor object at 0x04489FA0>
<sqlite3.Cursor object at 0x04489FA0>
<sqlite3.Cursor object at 0x04489FA0>
<sqlite3.Cursor object at 0x04489FA0>
<sqlite3.Cursor object at 0x04489FA0>
<sqlite3.Cursor object at 0x04489FA0>
<sqlite3.Cursor object at 0x04489FA0>
<sqlite3.Cursor object at 0x04489FA0>
<sqlite3.Cursor object at 0x04489FA0>
<sqlite3.Cursor object at 0x04489FA0>
<sqlite3.Cursor object at 0x04489FA0>
No error? Let’s commit! Hit CTRL+Z to exit:
db.commit()
db.close()
^Z
Now Open the database with DB Browser and browse data for fields:
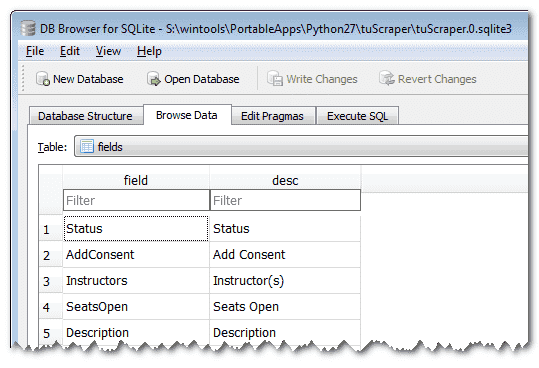
You see that? Bingo! You successfully created and inserted rows into your SQLite database from Python command line!
Working Scrapy Web Spider With Comments
Complete Python Script
Maybe a better idea would be to to start this tutorial with the complete script, then break it apart to explain how it works? Let me know in the comments. Usually that’s what I’m looking for when I search the web for examples.
# -*- coding: utf-8 -*-
import scrapy, sqlite3, re, datetime, arrow, sys, logging
from scrapy.spiders import CrawlSpider, Rule
from scrapy.linkextractors.sgml import SgmlLinkExtractor

version = 6.0
# Define numeric fields:
numerics = ['ClassNumber', 'SeatsTaken', 'SeatsOpen', 'ClassCapacity', 'WaitListTotal', 'WaitListCapacity']

# Define keys to remove: "Components" has no value
keys2remove=['Components']

# Define path to database:
database='tuScraper.sqlite3'

# Define SQL statement to check if a class number exists.
# The question mark will be replaced by a parameter:
sqlClassCheck = "SELECT COUNT(1) FROM classes WHERE ClassNumber = (?)"

# Define SQL statement to fetch all class numbers from the database for the loop:
sqlClassFetch = "SELECT ClassNumber FROM classes"

total=0                 # Define a global variable total that will be incremented by the threads
modulo=500              # Print status every 500 lines updates
nums = range(1000,7187) # Range of class numbers to scrap via URL
processRange = False    # Process either defined range of numbers or database content

# dict_factory method: transforms the output of rows = cursor.execute.fetchall from:# rows = [(2792,)] to rows = [{'ClassNumber': 7179, ..}]
def dict_factory(cursor, row):
  d = {}
  for idx, col in enumerate(cursor.description):
      d[col[0]] = row[idx]
  return d

# class name is arbitrary
class Tu1182PipelineSpider(CrawlSpider):
  # this name is called as parameter in the command line:
  name = 'tu1182v6'

  # your site base url, that the spider will modify for each loop:
  baseUrl = 'https://mytumobile.towson.edu/app/catalog/classsection/TOWSN/1182/'

  # start_urls is the reserved name list that the spider will parse:
  start_urls = []

  # Create db connection
  db = sqlite3.connect(database)

  # Attach the dict factory method to the post-process of row fetching
  db.row_factory = dict_factory

  # Create a cursor to communicate with the db
  cursor = db.cursor()

  if processRange:
    # This has to be done the very first time to fill the database.
    for num in nums: start_urls.append(baseUrl+str(num))
  else:
    # Execute the sqlClassFetch statement to get the list of class numbers from the database:
    # Output: rows = [{'ClassNumber': 7179, ..}]
    rows = cursor.execute(sqlClassFetch).fetchall()

    # Set modulo to 1 to print every lines updated if there are less than 20 numbers to process:
    if len(rows)<20: modulo=1

    # for each row returned, create an url to parse for the spider:
    for row in rows: start_urls.append(baseUrl+str(row["ClassNumber"]))
  #endif

  # This is the spider parse method that will be run in parallel against what's in the start_urls list
  # This method is run for each page.
  # Cache and parallel options are defined in Python27\tuScraper\tuScraper\settings.py
  def parse(self, response):
    # Fetch the attributes list from the page:
    keys = response.css('div.section-content div.pull-left div::text').extract()

    # Skip blank pages: process the rest only if there are attributes in the page
    if len(keys) > 0:
      # Get page title = class name + section
      title = response.css('title::text').extract_first()

      # Cleanup keys: keep only alpha-num + convert to ascii:
      keys = [re.sub(r'\W+', '', i).encode("utf-8") for i in keys]

      # Remove multiple items from the list:
      keys = [e for e in keys if e not in keys2remove]

      # Rename "CombinedSectionCapacity" to "ClassCapacity":
      keys = ['ClassCapacity' if x=='CombinedSectionCapacity' else x for x in keys]

      # Fetch values list from the page:
      values = response.css('div.section-content div.pull-right div::text').extract()
      ClassNumber = values[keys.index('ClassNumber')]

      # If we have more value than keys:
      if len(keys) > len(values):
        # Re-fetch values but one level above:
        prevalues = response.css('div.section-content div.pull-right div').extract()

        # Get indices of items containing "<div></div>" (empty value):
        indices = [i for i, x in enumerate(prevalues) if x == "<div></div>"]

        # For each empty value, insert a default value at the right indice:
        for i in indices: values.insert(i, "TBA")

      # On the other hand if there are more values than keys:
      elif len(keys) < len(values):
        # Remove every <br> from the body:
        response = response.replace( body=re.sub(r"<br\s*[\/]?>", "\n", response.body) )

        # Re-fetch values again:
        values = response.css('div.section-content div.pull-right div::text').extract()
      #endif

      # After these checks, if there are still more values than keys:
      if len(keys) < len(values):
        # Print error message on screen and log it:
        print 'ERROR for CLASS %s: len(keys)=%d len(values)=%d' % (ClassNumber, len(keys), len(values))
        self.logger.error('ERROR for CLASS %s: len(keys)=%d len(values)=%d' % (ClassNumber, len(keys), len(values)))
      self.logger.debug("ClassNumber %s: %d values + %d keys = %s" % (ClassNumber, len(keys), len(values), ','.join(keys)))

      # Make a dictionary by zipping keys against values:
      classDict = dict(zip(keys,values))

      # Create a secondary dictionary classDictValues with numeric values only:
      classDictValues = { key: classDict[key] for key in numerics }

      # Check if current class number is already in database:
      db = sqlite3.connect(database)
      cursor = db.cursor()
      cursor.execute(sqlClassCheck, (ClassNumber,))

      # If no row is returned, INSERT a new class definition in the main table:
      if not cursor.fetchone()[0]:
        print 'INSERT CLASS: %s' % (ClassNumber)
        self.logger.info('INSERT CLASS: %s' % (ClassNumber))

        # Remove numerics from classDict:
        for unwanted_key in numerics: del classDict[unwanted_key]

        # Implode classDict keys with comma separator for the SQL query:
        keys2insert = ','.join(classDict.keys())

        # Prepare the query string with values not in the dictionary:
        query_string = "INSERT INTO classes(ClassNumber,title,{}) VALUES ("+ClassNumber+","+title+",%s)"
        # Output will be: "INSERT INTO classes(ClassNumber,title,{}) VALUES (1234,Class title,%s)"

        # Append all the keys to insert to the query string.
        query_string = query_string.format(keys2insert) % ','.join('?' * len(classDict.keys()))
        # Output will be: "INSERT INTO classes(ClassNumber,title,Status,Meets,..) VALUES (1234,Class title,?,?,..)"

        # Execute the INSERT statement:
        try:
          cursor.execute(query_string, classDict.values())
          db.commit()
        except sqlite3.Error, e:
          print "sqlite3.Error %s" % (e)
          self.logger.error("sqlite3.Error %s" % (e))
          # This is how I discovered new fields not presents on every pages:
          # sqlite3.Error table classes has no column named Notes
          # etc
        #endtry
      #endif

      # Now we do the same for history table with the numeric values:
      keys2insert = ','.join(classDictValues.keys())

      # arrow will timestamp current datetime to a format that JavaScript can reconvert:
      query_string = "INSERT INTO history(timestamp,{}) VALUES ("+str(arrow.get(datetime.datetime.now()).timestamp)+",%s)"
      query_string = query_string.format(keys2insert) % ','.join('?' * len(classDictValues.keys()))

      global total  # get the global variable total to increment it; looks like PHP a lot, eh?
      total+=1

      # Test current number of rows processed against modulo to print status or not:
      if (total>=modulo and total%modulo == 0):
        print 'UPDATED HISTO ROWS: %d - Current class: %s' % (total, ClassNumber)
      self.logger.info('UPDATE total HISTO: %d - Current class: %s' % (total, ClassNumber))

      # Update the history table with numeric values:
      try:
        cursor.execute(query_string, classDictValues.values())
        db.commit()
      except sqlite3.Error, e:
        print "sqlite3.Error %s" % (e)
        self.logger.error("sqlite3.Error %s" % (e))

      # Uncomment this to log into json format:
      #yield classDict
Logging
The log from self.logger is defined in Python27\tuScraper\tuScraper\settings.py and will be under Python27\tuScraper\
You can enable a json log of your data if you uncomment the last line: yield something.
A word about the database inserts: according to the Scrapy best practices, updating a database should be done through a pipeline. There are pipelines scripts examples under <Python path>\tuScraper\tuScraper but I couldn’t manage to make them work under 2 days.
If you know someone who managed to do it, please let me know. Passing arguments to a pipeline has to be done via a dictionary. Losing time just to respect best practices is a loss of time.
Tuning Scrapy
Once you have something working, it’s time for tuning. Spider options are found in Python27\tuScraper\tuScraper\settings.py and detailed in the Scrapy wiki so I will just detail some options that I tuned here:
BOT_NAME = 'tuScraper'
LOG_LEVEL = 'INFO'
LOG_FILE = 'tuScraper.log'

# Crawl responsibly by identifying yourself (and your website) on the user-agent
USER_AGENT = 'tuScraper (+http://www.yourdomain.com)'

# https://doc.scrapy.org/en/latest/topics/broad-crawls.html
# Configure maximum concurrent requests performed by Scrapy (default: 16)
CONCURRENT_REQUESTS = 32
REACTOR_THREADPOOL_MAXSIZE = 20

# Enable and configure HTTP caching (disabled by default)
# See http://scrapy.readthedocs.org/en/latest/topics/downloader-middleware.html#httpcache-middleware-settings
HTTPCACHE_ENABLED = True # Default: False
HTTPCACHE_EXPIRATION_SECS = 0 # Default: 0
HTTPCACHE_DIR = 'httpcache'
HTTPCACHE_IGNORE_HTTP_CODES = [] # Don’t cache response with these HTTP codes
HTTPCACHE_STORAGE = 'scrapy.extensions.httpcache.FilesystemCacheStorage'
Cache
If enabled, cached pages will be found under Python27\tuScraper\.scrapy\<HTTPCACHE_DIR>\
I didn’t notice a huge performance upgrade but I like the idea to have cached data.
MS-DOS Batch to Run the Spider
Optionally, it can place your computer to sleep mode once it’s done! Place it under Python27\tuScraper\ :
@echo OFF

pushd %~dp0
path=%~dp0..;%~dp0..\Scripts;%PATH%

set sleep=n
set /P sleep=sleep computer after scraping? [y/N]

python ..\Scripts\scrapy.exe crawl tu1182v6
sync64

if "%sleep%" EQU "n" goto :END

:SLEEP
rundll32.exe powrprof.dll,SetSuspendState

:END
You can also generate a json log of your scraped data by adding the parameter -o logname.json to the python command and uncomment the last line of the Python script (yield something).
Wrapping up
This could not have been done in just 2 days without the good posts and examples given by other bloggers, that I thank dearly. They didn’t perform a whole analysis method along with providing a fully working script though.
This tutorial took me weeks to write so I hope it helps someone one day!