Install Kubernetes control-plane On Ubuntu 20.04
2 min read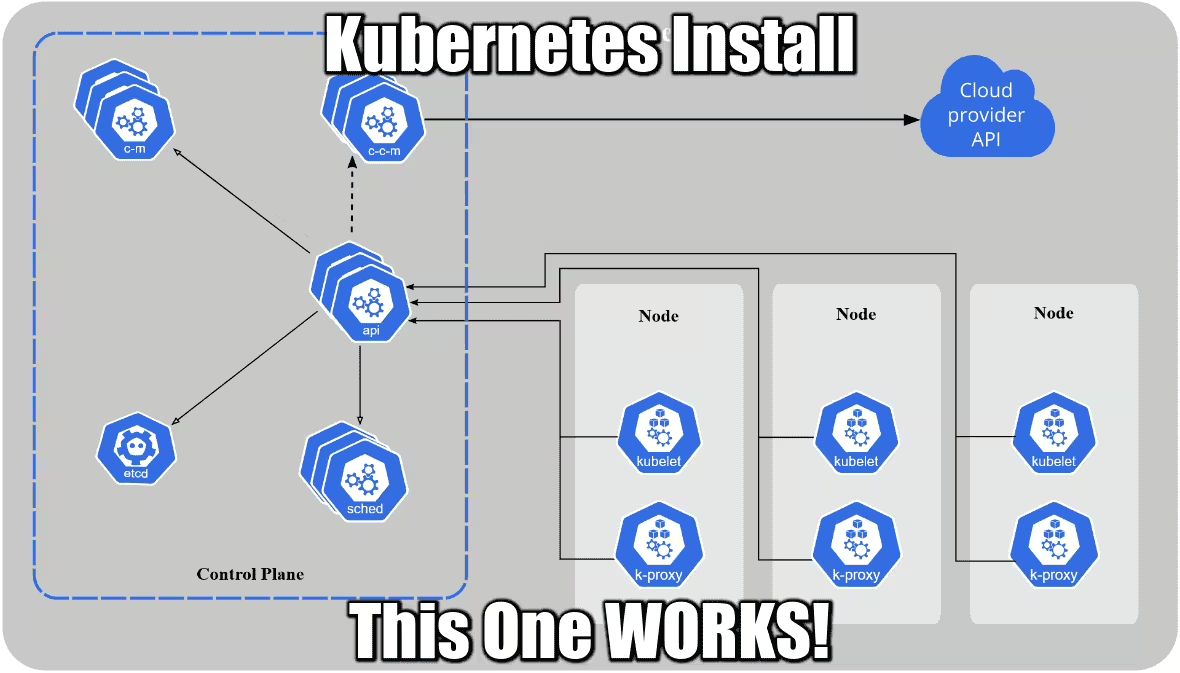
As much as you try, as much as you read their wiki, you will get nowhere until you spend a few hours and open a dozen links. It’s broken from the get go, yes. Installing it without certain parameters just won’t work. This recipe will save you hours. This recipe is just for the first master control-place.
Step 1 – Preparation
Requisites
- Cloud Ubuntu / Debian
- 2-4 CPU
- 2GB RAM
- public lan ports open from internet: 80, 443
- private lan ports open to this server: 6443
- 3 separate servers total, although this recipe only talks about the master node
Update Your system
First, switch to root for convenience. add sudo to all the commands below if you are not.
apt update -y && apt full-upgrade -y
apt clean && apt autoclean -y
apt autoremove -y --purge
Install Docker
Surprised? you actually just need conternerd but docker is also convenient to have and lightweight.
apt install -y docker.io
Wait a sec… docker.io? As explained here, docker-ce is provided by docker.com, docker.io is provided by Debian. The later is only slightly behind in terms of releases but guarantees stability.
Install Kubernetes
First you add the Kubernetes official repo:
apt install -y apt-transport-https ca-certificates curl bash-completion
sudo curl -fsSLo /usr/share/keyrings/kubernetes-archive-keyring.gpg https://packages.cloud.google.com/apt/doc/apt-key.gpg
echo "deb [signed-by=/usr/share/keyrings/kubernetes-archive-keyring.gpg] https://apt.kubernetes.io/ kubernetes-xenial main" | sudo tee /etc/apt/sources.list.d/kubernetes.list
apt update -y
Then you install Kubernetes binaries and tools:
apt install -y kubectl kubeadm kubelet
Optional but recommended if you are serious about Kubernetes, install the bash auto-completion tool:
apt install -y bash-completion
kubectl completion bash | sudo tee /etc/bash_completion.d/kubectl > /dev/null
Finally, install the convert plugin, which allows you to convert manifests between different API versions. This can be particularly helpful to migrate manifests to a non-deprecated api version with newer Kubernetes release.
curl -LO "https://dl.k8s.io/release/$(curl -L -s https://dl.k8s.io/release/stable.txt)/bin/linux/$(dpkg --print-architecture)/kubectl-convert"
curl -LO "https://dl.k8s.io/$(curl -L -s https://dl.k8s.io/release/stable.txt)/bin/linux/$(dpkg --print-architecture)/kubectl-convert.sha256"
echo "$(<kubectl-convert.sha256) kubectl-convert" | sha256sum --check
sudo install -o root -g root -m 0755 kubectl-convert /usr/local/bin/kubectl-convert
Step 2 – Cgroup drivers
On all nodes ensure that the Cgroup driver used by the kubelet is the same as the one used by Docker. If you don’t, you will face the error kubelet isn't running or healthy during initialization:
[kubelet-check] It seems like the kubelet isn't running or healthy.
[kubelet-check] The HTTP call equal to 'curl -sSL http://localhost:10248/healthz' failed with error: Get http://localhost:10248/healthz: dial tcp 127.0.0.1:10248: connect: connection refused.
This is caused by discrepancy between the host system, docker and kubelet Cgroup drivers: cgroupfs vs systemd. People around recommend to disable the swap (why??) or use cgroupfs for kubelet as well. NO, DO NO use cgroupfs, as recommended by Google themselves:
using the
cgroupfsdriver with kubeadm is not recommended.
In v1.22, if the user is not setting the cgroupDriver field under KubeletConfiguration, kubeadm will default it to systemd. Therefore, let’s make sure kubelet AND docker use systemd.
Create kubeadm-config.yaml
Get the kubelet version installed:
kubectl version -o json --output yaml | grep gitVersion
# gitVersion: v1.23.3
Use that version in the file kubeadm-config.yaml that you will create:
kind: ClusterConfiguration
apiVersion: kubeadm.k8s.io/v1
kubernetesVersion: v1.23.0
---
kind: KubeletConfiguration
apiVersion: kubelet.config.k8s.io/v1
cgroupDriver: systemd
Switch docker to systemd
If this command returns systemd, skip this step:
docker info | grep -i cgroup
# Cgroup Driver: cgroupfs
Have docker use systemd driver:
cat << EOF > /etc/docker/daemon.json
{
"exec-opts": ["native.cgroupdriver=systemd"]
}
EOF

mkdir -p /etc/systemd/system/docker.service.d
Now we can reset iptables and the cluster if you already tried before.
systemctl stop kubelet
systemctl stop docker
iptables --flush
iptables -tnat --flush
systemctl daemon-reload
systemctl restart docker
systemctl restart kubelet
Open ports and bridge iptables
The only port you need to open is 6443. Also you need to bridge iptables or your worker’s won;t be able to connect to your master as explained here:
sysctl net.bridge.bridge-nf-call-iptables=1
sudo ufw allow 6443
Step 3 – Initialize your master cluster / control-plane!
The actual name is control-plane, and even though a simple kubeadm init will do, your coredns pods won’t work in the end. The parameters below will GUARANTEE you a working cluster off the batch or your money back!
kubeadm init --control-plane-endpoint=NODEDNS --node-name NODENAME --pod-network-cidr=10.244.0.0/16 --config kubeadm-config.yaml
Note that we also pass the kubeadm-config.yaml file created earlier.
The reason we add pod-network-cidr: the coredns pods need an overlay network provider called Flannel. For flannel to work correctly, you must pass --pod-network-cidr=10.244.0.0/16 to kubeadm init. This is only true for the master node. Other worker nodes should not run this command.
There is another overlay network provider available called weave, but coredns is pre-configured for Flannel. And Flannel is not installed by default. Don’t ask me why. Flannel is a plugin.
Finally, we initialize the kube environment for your user. You need to do that every time you reset your cluster:
mkdir -p $HOME/.kube
sudo cp /etc/kubernetes/admin.conf $HOME/.kube/config
sudo chown $(id -u):$(id -g) $HOME/.kube/config
At this point, a minimal control-plane is created and running, but you can see the coredns pods struggling to start:
kubectl get pods --all-namespaces

# NAMESPACE     NAME                               READY   STATUS    RESTARTS   AGE
# kube-system   coredns-64897985d-n8g8j            0/1     Pending   0          31m
# kube-system   coredns-64897985d-v48tb            0/1     Pending   0          31m
# kube-system   etcd-NODENAME                      1/1     Running   5          31m
# kube-system   kube-apiserver-NODENAME            1/1     Running   5          31m
# kube-system   kube-controller-manager-NODENAME   1/1     Running   6          31m
# kube-system   kube-proxy-x85k6                   1/1     Running   0          31m
# kube-system   kube-scheduler-NODENAME            1/1     Running   6          31m
They will eventually fail on timeout and fall in Error or ContainerCreating stae.
Step 4 – Install Flannel overlay and save the day!
Finally, we install the Flannel pod, AND we restart the cluster clean:
kubectl apply -f https://raw.githubusercontent.com/flannel-io/flannel/master/Documentation/kube-flannel.ymlsystemctl stop kubelet

systemctl stop kubelet
systemctl stop docker
iptables --flush
iptables -tnat --flush
systemctl start docker
systemctl start kubelet
After 30 seconds max, you should have ALL your pods running:
kubectl get pods --all-namespaces -o wide

# NAMESPACE             NAME                             READY  STATUS   IP            NODE
# kube-system           coredns-64897985d-2zzrs          1/1    Running  10.244.0.11   NODENAME1
# kube-system           coredns-64897985d-fc7m9          1/1    Running  10.244.0.10   NODENAME1
# kube-system           etcd-NODENAME                    1/1    Running  10.0.0.10     NODENAME1
# kube-system           kube-apiserver-NODENAME          1/1    Running  10.0.0.10     NODENAME1
# kube-system           kube-controller-manager-NODENAME 1/1    Running  10.0.0.10     NODENAME1
# kube-system           kube-flannel-ds-mdzxf            1/1    Running  10.0.0.10     NODENAME1
# kube-system           kube-proxy-7svbh                 1/1    Running  10.0.0.10     NODENAME1
# kube-system           kube-scheduler-NODENAME          1/1    Running  10.0.0.10     NODENAME1
DONE! Now you can install another one and join them together, or add workers. Or also install a dashboard.
Next
Next step is adding a dashboard and proxy it, to access it from outside.
Wrapping Up
The part that bite me the most what the coredns stuck in Pending or ContainerCreating state. There was so many misleading information everywhere! Sometimes you also see errors about your node having a taint (1 node(s) had taint {node.kubernetes.io/not-ready: }, that the pod didn't tolerate.), and if you start meddling with this it’s a Pandora box I swear.
The reason why coredns cannot start with a cluster installed with a simple kubeadm init is because of Flannel. It’s somehow needed by coredns but they won’t tell you why or why it’s a dependency!
To see the original error by yourself, look at the pod log for one of your coredns, at the end of Step 3:
kubectl -n kube-system describe pod coredns-67bd85f8bc-6ktdn

# Events:
# Type Reason Age From Message
# ---- ------ ---- ---- -------
 # Warning FailedCreatePodSandBox 3m59s (x4 over 4m2s) kubelet (combined from similar events): Failed to create pod sandbox: rpc error: code = Unknown desc = failed to set up sandbox container "4ddfb67cdeef735712cce2bfe74e2cd35276f79336bf617d68fcdcfa8ff" network for pod "coredns-67bd85f8bc-6ktdn": networkPlugin cni failed to set up pod "coredns-67bd85f8bc-6ktdn_kube-system" network: open /run/flannel/subnet.env: no such file or directory
You will see that CNI is failing or missing, and /run/flannel/subnet.env does not exist. You can create it manually as described here, but this won’t survive a reboot. Some people also suggested to install a CNI driver with go, and compile it… Oh please…
If you feel like I helped you in any way, a nice comment is always appreciated!