Conditionally Serving WebP Images With Nginx
8 min readWebP is a next generation image format spearheaded by Google since 2013, which provides advanced compression options. While it is so much better than legacy formats, it is only supported at the moment of writing (February 2018) by Chrome, and Opera on desktops and Android (see Can I use WebP image format? for more details). As of today, Firefox is not scheduled to support WebP in future versions.
For an overview of WebP format and its shocking compression ration, see WebP: Another Google Project Behind the Scenes.
Practical solution is to serve images conditionally depending on the client browser WebP support. This recipe discusses how to do it with nginx.
There is even better coming soon: AVIF Revolution!
Cloudflare Incompatibility
Last minute discovery: You cannot use this if you enable Clouflare caching ![]() . Once you enable it, Clouflare will cache the images served during your first access to the site:
. Once you enable it, Clouflare will cache the images served during your first access to the site:
- If you load it with Chrome the first time, Cloudflare will cache WebP only and render Firefox incompatible with your site.
- If you browse with Firefox the first time, Cloudflare will cache original images and will never serve WebP images. Cloudflare do cache WebP, you can verify it here.
This behavior is expected from a caching proxy. That’s too bad indeed. Thus, you face a difficult choice if you want to benefit from Cloudflare’s caching abilities.
First, install ImageMagick + WebP
This is for apt-get package managers, but just use the one you want:
- Install magick and webp binaries
apt-get -y install imagemagick webp
- Test the conversion with a file called image-170×150.png:
cd /yourpath/wp-content/uploads/2018/02
convert image-170x150.png -quality 50 -define webp:lossless=false,method=6,auto-filter=true,partitions=3 image-170x150.webp
- Working? Now let’s test both your images on Chrome or Opera:
https://www.your-blog.com/wp-content/uploads/2018/02/image-170×150.png
https://www.your-blog.com/wp-content/uploads/2018/02/image-170×150.png.webp
Working? You see something?? Really??? Congrats! Let’s do the second part ????
Convert Error message?
convert: delegate failed `"cwebp" -quiet -q %Q "%i" -o "%o"' @ error/delegate.c/InvokeDelegate/1310.
This indicates that Magick couldn’t find the webp dependency. Either you forgot to install it, or your installation is broken. Uninstall then reinstall imagemagick then webp.
Second, Generate WebP Images
You will need to create a function or a script to convert all your image files within the upload folder. Here is a quick and trashy example:
function webp() {
local i j force
[ "$1" = "-f" ] && force=y && shift
! (($#)) && echo "Usage: ${FUNCNAME} [-f] <[directory] [image file] ..>"
for i in "$@"; do
 [ -d "$i" ] && echo "create WebP under $i/" && webp $i/* && continue
 [ -f "$i" -a "${i##*\.}" != "webp" ] && [ ! -f "$i.webp" -o "$force" = "y" ] && convert "$i" -quality 50 -define webp:lossless=false,method=6,auto-filter=true,partitions=3 "$i.webp" 2>/dev/null
done
}
This function will create WebP for files and/or files within folders passed in parameter, recursively.
Usage:
# convert a single file:
webp /yourpath/wp-content/uploads/2018/02/singlefile.jpg

# convert everything recursively under uploads:
webp /yourpath/wp-content/uploads
Remember to set the quality factor to something you want. For me, small images are OK with 50, but I go as low as 30 for large images (3600×2400 and above). Most people won’t notice the difference anyway.
Third, configure nginx for WebP (not this one!)
[Edit Sunday 3, March 2018] There is much better, less invasive method to do that. I keep track of the one bellow for the record.
I’m sure you landed on this page just for that…
If you want to be started with nginx, you better check this complete nginx sample config that I forked from A5hleyRich/wordpress-nginx. It’s a really good, clean starter that implement SSL anf FastCGI cache.
Step 1
Create the file /etc/nginx/conf.d/outdated.conf to detect the browsers not to server WebP to:
map $http_user_agent $outdated {
  default                                 1;
  "~*Opera Mini/[5-9]"                    0;
  "~*Opera Mobi"                          0;
  "~*Chrome/[4-9][0-9]\."                 0;
  "~*UCBrowser/11\.[8-9]"                 0;
  "~*UCBrowser/12\."                      0;
}

## you could map webp_extension directly and spare one if
# map $http_user_agent $webp_extension {
  # default                                 "";
  # "~*Opera Mini/[5-9]"                    ".webp";
  # "~*Opera Mobi"                          ".webp";
  # "~*Chrome/[4-9][0-9]\."                 ".webp";
  # "~*UCBrowser/11\.[8-9]"                 ".webp";
  # "~*UCBrowser/12\."                      ".webp";
# }

map $outdated $webp_extension {
  default "";
  0 ".webp";
}
You can get some list of user agents here and here.
Step 2
Make sure it is included under the http directive in nginx.conf:
  (...)
  ## Modules
  include /etc/nginx/conf.d/*.conf;

  ## Sites
  include /etc/nginx/sites-enabled/*;
}
Step 3
Create a location file and name it /etc/nginx/locations/wp-content-uploads-webp.conf:
location ~* /wp-content/uploads/.+\.(png|jpe?g)$ {

  try_files $uri.webp $uri =404;
}
This scheme is critical because only Chrome, Opera and Android browser will load WebP images. It will break your site if you serve them to any other browser. This is also a good example where if is not evil.
You could also use it pathless so it will apply for any image across your sites, well it’s up to you.
In nginx, any header that you define under a location will overwrite all the other header directives that were previously defined for the items affected. You must re-add the max-age Cache-Control directive here, because it certainly was before.Notice about nginx locations
In nginx, there is no such else statement in the if test. So you can use break; and nginx will continue the processing at the line after where it started the if.Notice about nginx if-then-else
Step 4
Include /etc/nginx/locations/wp-content-uploads-webp.conf inside the root location from your blog, just before the try_files:
server {
  ## Ports to listen on, uncomment one.
  listen 443 ssl http2;
  listen [::]:443 ssl http2;

  ## Server name to listen for
  server_name www.your-blog.com;

  (.. stuff here ..)

  location / {
    include locations/wp-content-uploads-webp.conf;
    try_files $uri $uri/ /index.php?$args;
  }

  location ~ \.php$ {
    .. rest of your stuff ..
This file should actually be included before or after the root location, not within. But I’ll be honest here: it just didn’t work with my configuration. I’m using nginx-extra and the configuration from A5hleyRich so maybe there’s a correlation, I don’t know. Do whatever works for you. A lot of internet examples I tried do not work as expected either, and that may be because nginx is actively updated and the rules change more often than with Apache?Best Practice
Test the configuration then reload nginx and voila ????
sudo nginx -t && sudo service nginx reload
Sources: grunt-tight-sprite and centminmod.com (none did provide a fully working example)
Third, configure nginx for WebP (use this one)
I’m sure you landed on this page just for that…
If you want to be started with nginx, you better check this complete nginx sample config that I forked from A5hleyRich/wordpress-nginx. It’s a really good, clean starter that implement SSL anf FastCGI cache.
Step 1
Create the file /etc/nginx/conf.d/webp.conf to conditionally map the $img_suffix served to the browser, against the $http_accept header sent by the browser:
## Chrome/65 accept : image/webp,image/apng,image/*,*/*;q=0.8
## Firefox/58 accept: */*
## iPhone5s   accept: */*
map $http_accept $img_suffix {
  "~*webp"  ".webp";
  "~*jxr"   ".jxr";
}

## https://github.com/cdowdy/Nginx-Content-Negotiation/blob/master/nginx.conf
map $msie $cache_control {
  "1"     "private";
}
map $msie $vary_header {
  default "Accept";
  "1"     "";
}
How it works:
When accessing an image, the browser send a header called Accept:, hold in nginx by $http_accept which states what image types it’s able to process:
Chrome/65 accept : image/webp,image/apng,image/*,*/*;q=0.8
Firefox/58 accept: */*
iPhone5s accept: */*
We look for the specific keyword webp, then jxr. If matched, $img_suffix is set with either .webp or .jxr.
Cloudflare users, WARNING: the first browser accessing your resources will set up the extensions that Cloudflare will cache for that particular page, no matter what browser will access the resources afterward.Step 2
Since you created webp.conf under conf.d/, it should be automatically included in nginx.conf. Nothing to do.
You can double check conf.d/* is included under the http directive in nginx.conf:
  (...)
  ## Modules
  include /etc/nginx/conf.d/*.conf;

  ## Sites
  include /etc/nginx/sites-enabled/*;
}
Step 3
If you use the nginx configuration from A5hleyRich/wordpress-nginx, or even better, my complete nginx sample config, then you should have a static-files.conf definition which is loaded in your server directive:
## https://github.com/cdowdy/Nginx-Content-Negotiation/blob/master/nginx.conf
location ~* \.(?:jpg|jpeg|gif|png|ico|cur|webp|jxr)$ {
  include global/server/security.conf;
  expires 1M;
  add_header Vary $vary_header;
  add_header Cache-Control $cache_control;
  add_header Cache-Control "public";
  ## Comment to enable the access-accept.log scraper:
  access_log off;
  try_files $uri$img_suffix $uri =404;
}
This location will catch image files, set up the correct expiration headers and Cache-Control, and try files with an $img_suffix. Remember, $img_suffix is set only for browsers that explicitly noticed nginx. You don’t even need an if is evil!
Step 4
Test the configuration then reload nginx and voila ????
sudo nginx -t && sudo service nginx reload
Sources: Nginx-Content-Negotiation, corydowdy.com
Fourth, test it! With Chrome and Curl
1) Use curl to get the headers from an image you converted, both with its own user agent and with an Accept: header for WebP compatible browser:
- Native Curl user agent:
curl -I -L https://www.your-blog.com/wp-content/uploads/2018/02/image.png
HTTP/2 200
server: nginx
date: Wed, 28 Feb 2018 16:07:42 GMT
content-type: image/png
content-length: 117697
last-modified: Sat, 24 Feb 2018 18:09:48 GMT
etag: "5a91aa6c-1cbc1"
x-robots-tag: noindex, nofollow
vary: Accept-Encoding
cache-control: public, no-transform, max-age=31536000
accept-ranges: bytes
That’s good: GET a png returns a png for Curl.
- Fake Chrome WebP accept header:
curl -I -L -H "accept:image/webp,image/apng,image/*,*/*;q=0.8" https://www.your-blog.com/wp-content/uploads/2018/02/image.png
Here is the log you want to see:
HTTP/2 200
server: nginx
date: Sun, 04 Mar 2018 17:04:18 GMT
content-type: image/webp
content-length: 37148
last-modified: Wed, 28 Feb 2018 05:47:59 GMT
etag: "5a96428f-911c"
expires: Tue, 03 Apr 2018 17:04:18 GMT
cache-control: max-age=2592000
x-frame-options: SAMEORIGIN
x-content-type-options: nosniff
x-xss-protection: 1; mode=block
referrer-policy: no-referrer-when-downgrade
content-security-policy: default-src 'self' https: data: 'unsafe-inline' 'unsafe-eval'
x-content-security-policy: default-src 'self' https: data: 'unsafe-inline' 'unsafe-eval'
x-webkit-csp: default-src 'self' https: data: 'unsafe-inline' 'unsafe-eval'
vary: Accept
cache-control: public
accept-ranges: bytes
content-type: image/webp
You call a png, and nginx sends a webp. Yummy ????
2) Hit F12 and test the same URL with Chrome, Firefox and IE to validate that you still see the original pictures:
- Chrome:
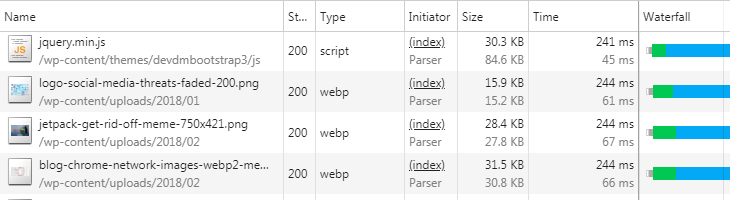
- Firefox:

- IE:
Cannot test, as I prevent IE from accessing the web via Microsoft Firewall. I’m a security freak I know.
Wrapping Up
In this tutorial you should have learned to:
- Convert any picture to WebP format
- Setup nginx to conditionally serve WebP/jxr images upon the browser capabilities
- Test an URL header with Curl
- Test your Yslow score with GTmetrix and Pingdom tools
This method obviously breaks the benefits from using the free Cloudflare CDN, as it cannot conditionally serve images. To use it, you unfortunately have to disable the caching option.
To circumvent this, there is a solution though: Load alternative image formats. Thus, you have to tweak your website to add a srcset attribute that will list the alternatives (WebP) while the <img src> will serve the regular image.


How do i create the function i’m using wordpress should i add the function or script in my function.php file?
The function i give is BASH. It’s meant to be run on the images directly, on the system that hosts the images. You cannot do that from WordPress as explained here https://www.it-cooking.com/technology/web/cms/wordpress/you-cannot-enable-webp-in-wordpress/
What about cloudfront, same issue with cloudflare about caching ? I didn’t test but same problem here, wht you think ?